using OpenCvSharp;
using System;
using System.Collections.Generic;
using System.Linq;
namespace demo
{
internal class Program
{
static void Main(string[] args)
{
demo1();
//demo2();
}
/// <summary>
/// 切图
/// </summary>
/// <returns></returns>
static List<List<Mat>> RoiImages(string path)
{
Mat img = Cv2.ImRead(path);
Mat gray = new Mat();
Cv2.CvtColor(img, gray, ColorConversionCodes.BGR2GRAY);
List<List<Mat>> cells = new List<List<Mat>>();
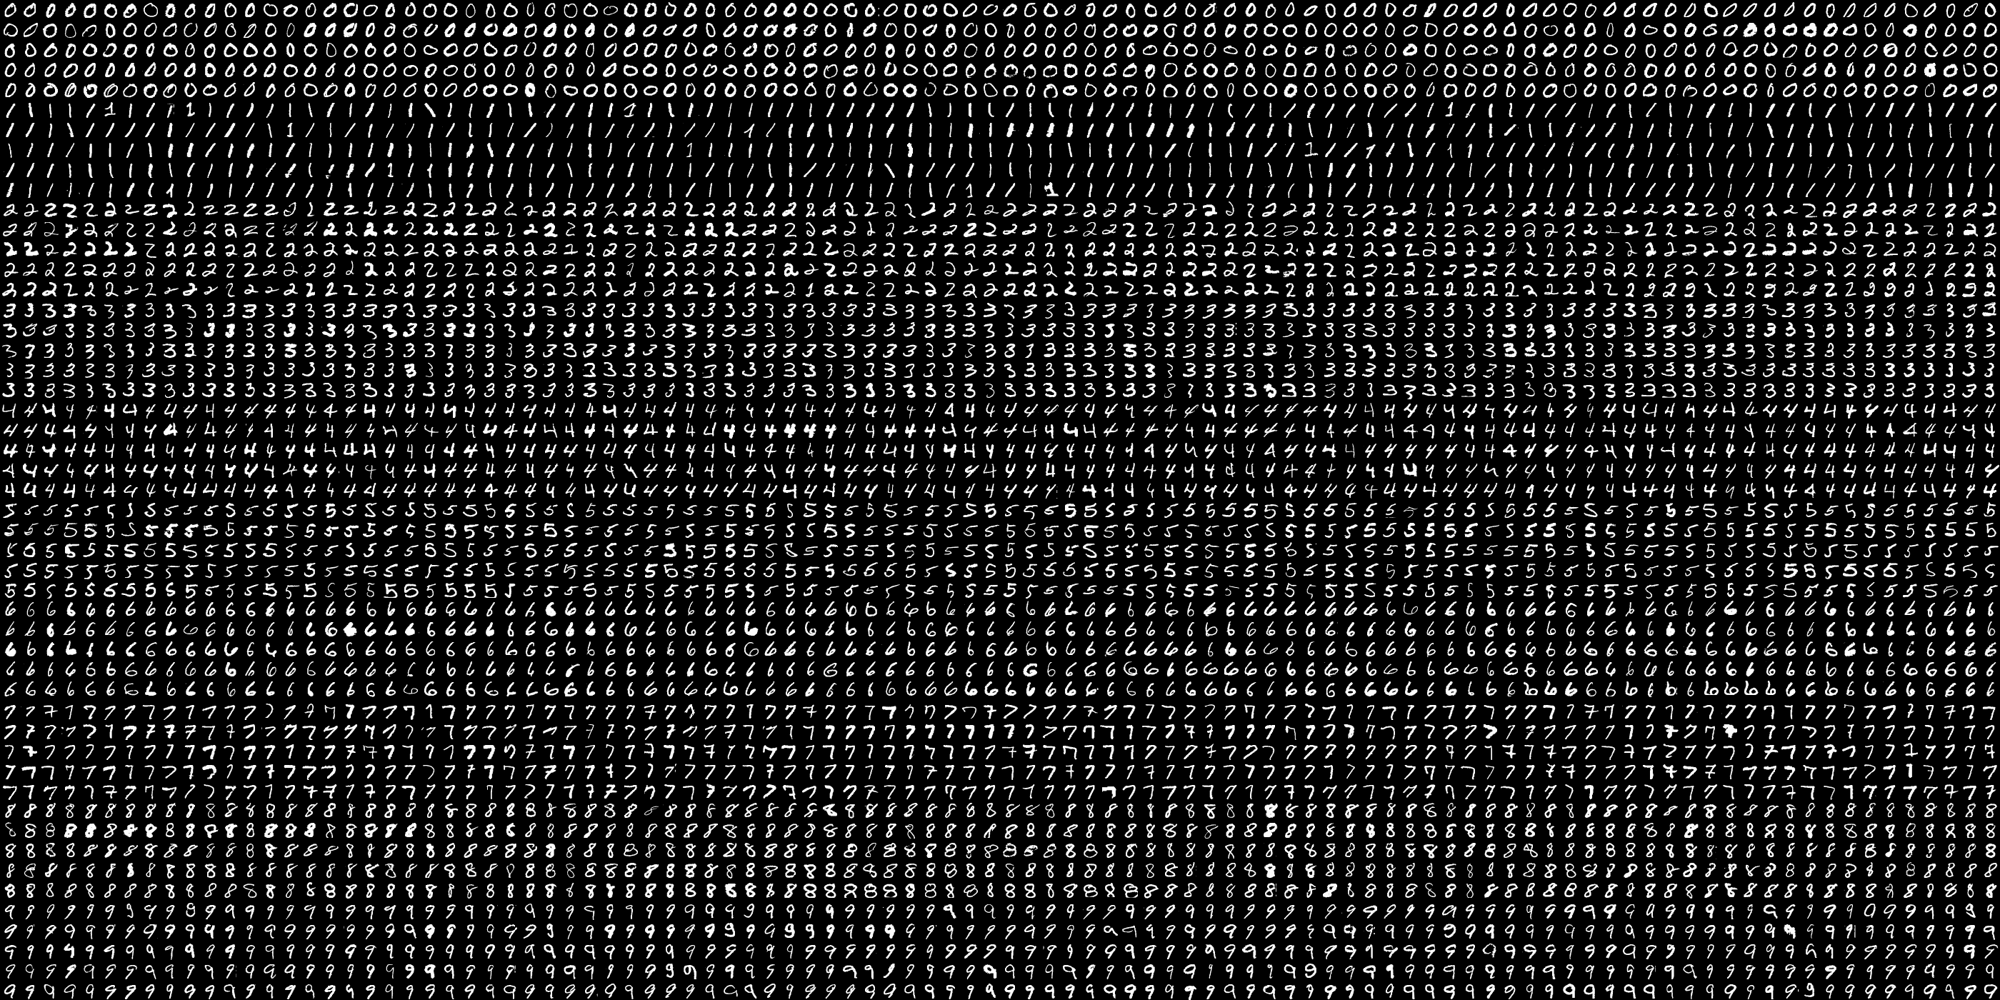
int w = gray.Width / 100; // 每行100个字符
int h = gray.Height / 50; // 共50行
Mat roi = new Mat();
for (int i = 0; i < 10; i++) // 数字0~9
{
cells.Add(new List<Mat>());
for (int j = 0; j < 5; j++) // 每组数字有5行
{
for (int n = 0; n < 100; n++) // 每行100个字符
{
Rect rect = new Rect()
{
X = n * w,
Y = h * ((i * 5) + j),
Width = w,
Height = h
};
roi = new Mat(gray, rect);
cells[i].Add(roi);
//Console.WriteLine(rect);
//Cv2.ImShow("roi", roi);
//Cv2.WaitKey(1);
}
}
}
return cells;
}
/// <summary>
/// 模型训练
/// </summary>
static void demo1()
{
// 切图
var cells = RoiImages("../../../images/digits.png");
// 训练数据数量,前400张图片用来训练
int train_sample_count = 400 * 10;
// 测试数据数量,后100张图片用来测试
int test_sample_count = 100 * 10;
// 声明训练数据集合 mat,图像尺寸:20*20
Mat trainData = new Mat(train_sample_count, 20 * 20, MatType.CV_32FC1);
// 声明测试数据集合 mat
Mat testData = new Mat(test_sample_count, 20 * 20, MatType.CV_32FC1);
// 声明训练数据标签 mat
Mat trainLabel = new Mat(train_sample_count, 1, MatType.CV_32FC1);
// 声明测试数据标签 mat
Mat testLabel = new Mat(test_sample_count, 1, MatType.CV_32FC1);
// 组织训练数据,循环训练文件夹内所有图片。
int trainNum = 0;
for (int i = 0; i < 10; i++)
{
var cell = cells[i].Take(400);
foreach (Mat temp in cell)
{
// 转换CV_32FC1,因为下面训练函数需要这个格式
temp.ConvertTo(temp, MatType.CV_32FC1);
// 写入到训练数据集合的mat内,注意reshape的用法。
/*
reshape有两个参数:
其中,参数:cn为新的通道数,如果cn = 0,表示通道数不会改变。
参数rows为新的行数,如果rows = 0,表示行数不会改变。
注意:新的行* 列必须与原来的行*列相等。就是说,如果原来是5行3列,新的行和列可以是1行15列,3行5列,5行3列,15行1列。
设置行数后,列数会自动调整。比如此处 调整为 1行784列。
*/
temp.Reshape(0, 1).CopyTo(trainData.Row(trainNum));
// 写入到训练标签集合的mat内
trainLabel.Set<float>(trainNum, i);
trainNum++;
}
}
// 组织测试数据
int testNum = 0;
for (int i = 0; i < 10; i++)
{
var cell = cells[i].Skip(400);
foreach (Mat temp in cell)
{
temp.ConvertTo(temp, MatType.CV_32FC1);
temp.Reshape(0, 1).CopyTo(testData.Row(testNum));
testLabel.Set<float>(testNum, i);
testNum++;
}
}
// 创建knn模型
OpenCvSharp.ML.KNearest knn = OpenCvSharp.ML.KNearest.Create();
// k 可以根据需要自行调整
int k = 3;
// 设置K值
knn.DefaultK = k;
// 设置KNN是进行分类还是回归
knn.IsClassifier = true;
// 设置算法类型 BruteForce 或 KdTree
knn.AlgorithmType = OpenCvSharp.ML.KNearest.Types.BruteForce;
// 训练
knn.Train(trainData, OpenCvSharp.ML.SampleTypes.RowSample, trainLabel);
// 训练完成之后,可以用knn.Save()保存模型文件。
knn.Save("knn_digits.yml");
// 测试
Mat result = new Mat(test_sample_count, 1, MatType.CV_32FC1);
knn.FindNearest(testData, k, result);
int t = 0;
int f = 0;
for (int i = 0; i < test_sample_count; i++)
{
int predict = (int)result.At<float>(i);
int actual = (int)testLabel.At<float>(i);
if (predict == actual)
{
Console.WriteLine("正确:" + predict + "-" + actual);
t++;
}
else
{
Console.WriteLine("错误------:" + predict + "-" + actual);
f++;
}
}
double accuracy = (t * 1.0) / (t + f);
Console.WriteLine("准确率:" + accuracy);
Console.Read();
}
/// <summary>
/// 模型加载与测试
/// </summary>
static void demo2()
{
// 测试数据数量
int test_sample_count = 100 * 10;
// 声明测试数据集合 mat,
Mat testData = new Mat(test_sample_count, 20 * 20, MatType.CV_32FC1);
// 声明测试数据标签 mat
Mat testLabel = new Mat(test_sample_count, 1, MatType.CV_32FC1);
// 创建knn模型
OpenCvSharp.ML.KNearest knn = OpenCvSharp.ML.KNearest.Load("knn_digits.yml");
// 读取测试切图
var cells = RoiImages("../../../images/digits.png");
// 组织测试数据
int testNum = 0;
for (int i = 0; i < 10; i++)
{
var cell = cells[i].Skip(400);
foreach (Mat temp in cell)
{
temp.ConvertTo(temp, MatType.CV_32FC1);
temp.Reshape(0, 1).CopyTo(testData.Row(testNum));
testLabel.Set<float>(testNum, i);
testNum++;
}
}
int k = 3;
// 测试
Mat result = new Mat(test_sample_count, 1, MatType.CV_32FC1);
// 在训练样本中寻找最接近待分类样本的前K个样本,并返回K个样本中数量最多类型的标签。
knn.FindNearest(testData, k, result);
int t = 0;
int f = 0;
for (int i = 0; i < test_sample_count; i++)
{
int predict = (int)result.At<float>(i);
int actual = (int)testLabel.At<float>(i);
if (predict == actual)
{
Console.WriteLine("正确:" + predict + "-" + actual);
t++;
}
else
{
Console.WriteLine("错误------:" + predict + "-" + actual);
f++;
}
}
double accuracy = (t * 1.0) / (t + f);
Console.WriteLine("准确率:" + accuracy);
Console.Read();
}
}
}
C++版本代码如下:
#include <opencv2/core/core.hpp>
#include <opencv2/highgui/highgui.hpp>
#include <opencv2/imgproc/imgproc.hpp>
#include <opencv2/ml/ml.hpp>

using namespace cv;
using namespace std;

// 切图
vector<vector<Mat>> RoiImages(string path)
{
    Mat img = cv::imread(path);
    Mat gray;
    cv::cvtColor(img, gray, COLOR_BGR2GRAY);

    vector<vector<Mat>> cells;
    int w = gray.cols / 100; // 每行100个字符
    int h = gray.rows / 50; // 共50行
    for (int i = 0; i < 10; i++) // 数字0~9
    {
        vector<Mat> imgs;
        for (int j = 0; j < 5; j++) // 每组数字有5行
        {
            for (int n = 0; n < 100; n++) // 每行100个字符
            {
                Rect rect(n * w, h * ((i * 5) + j), w, h);
                Mat roi = gray(rect);
                imgs.push_back(roi);
                //cv::imshow("roi", roi);
                //cv::waitKey(1);
            }
        }
        cells.push_back(imgs);
    }
    return cells;
}

// 模型训练
void demo1()
{
    // 切图
    vector<vector<Mat>> cells = RoiImages("../images/digits.png");

    // 训练数据数量,前400张图片用来训练
    int train_sample_count = 400 * 10;
    // 测试数据数量,后100张图片用来测试
    int test_sample_count = 100 * 10;
    // 声明训练数据集合 mat,图像尺寸:20*20
    Mat trainData(train_sample_count, 20 * 20, CV_32FC1);
    // 声明测试数据集合 mat
    Mat testData(test_sample_count, 20 * 20, CV_32FC1);
    // 声明训练数据标签 mat
    Mat trainLabel(train_sample_count, 1, CV_32FC1);
    // 声明测试数据标签 mat
    Mat testLabel(test_sample_count, 1, CV_32FC1);

    // 组织训练数据,循环训练文件夹内所有图片。
    int trainNum = 0;
    for (int i = 0; i < 10; i++)
    {
        for (int j = 0; j < 400; j++)
        {
            Mat temp = cells[i][j];
            // 转换CV_32FC1,因为下面训练函数需要这个格式
            temp.convertTo(temp, CV_32FC1);
            // 写入到训练数据集合的mat内,注意reshape的用法。
            /*
            reshape有两个参数:
            其中,参数:cn为新的通道数,如果cn = 0,表示通道数不会改变。
            参数rows为新的行数,如果rows = 0,表示行数不会改变。
            注意:新的行* 列必须与原来的行*列相等。就是说,如果原来是5行3列,新的行和列可以是1行15列,3行5列,5行3列,15行1列。
                  设置行数后,列数会自动调整。比如此处 调整为 1行784列。
            */
            temp.reshape(0, 1).copyTo(trainData.row(trainNum));
            // 写入到训练标签集合的mat内
            trainLabel.at<float>(trainNum) = i;
            trainNum++;
        }
    }

    // 组织测试数据
    int testNum = 0;
    for (int i = 0; i < 10; i++)
    {
        for (int j = 400; j < cells[i].size(); j++)
        {
            Mat temp = cells[i][j];
            temp.convertTo(temp, CV_32FC1);
            temp.reshape(0, 1).copyTo(testData.row(testNum));
            testLabel.at<float>(testNum) = i;
            testNum++;
        }
    }

    // 创建knn模型
    Ptr<ml::KNearest> knn = ml::KNearest::create();
    // k 可以根据需要自行调整
    int k = 3;
    knn->setDefaultK(k);
    // 设置KNN是进行分类还是回归
    knn->setIsClassifier(true);
    // 设置算法类型 BruteForce 或 KdTree
    knn->setAlgorithmType(ml::KNearest::Types::BRUTE_FORCE);
    // 训练
    knn->train(trainData, ml::SampleTypes::ROW_SAMPLE, trainLabel);
    // 训练完成之后,可以用knn.Save()保存模型文件。
    knn->save("knn_digits.yml");

    // 测试
    Mat result(test_sample_count, 1, CV_32FC1);
    knn->findNearest(testData, k, result);
    int t = 0;
    int f = 0;
    for (int i = 0; i < test_sample_count; i++)
    {
        int predict = (int)result.at<float>(i);
        int actual = (int)testLabel.at<float>(i);
        if (predict == actual)
        {
            cout << "正确:" << predict << "-" << actual << endl;
            t++;
        }
        else
        {
            cout << "错误------:" << predict << "-" << actual << endl;
            f++;
        }
    }

    double accuracy = (t * 1.0) / (t + f);
    cout << "准确率:" << accuracy << endl;
}

// 模型加载与测试
void demo2()
{
    // 测试数据数量
    int test_sample_count = 100 * 10;
    // 声明测试数据集合 mat,
    Mat testData(test_sample_count, 20 * 20, CV_32FC1);
    // 声明测试数据标签 mat
    Mat testLabel(test_sample_count, 1, CV_32FC1);

    // 创建knn模型
    Ptr<ml::KNearest> knn = ml::KNearest::load("knn_digits.yml");

    // 切图
    vector<vector<Mat>> cells = RoiImages("../images/digits.png");

    // 组织测试数据
    int testNum = 0;
    for (int i = 0; i < 10; i++)
    {
        for (int j = 400; j < cells[i].size(); j++)
        {
            Mat temp = cells[i][j];
            temp.convertTo(temp, CV_32FC1);
            temp.reshape(0, 1).copyTo(testData.row(testNum));
            testLabel.at<float>(testNum) = i;
            testNum++;
        }
    }

    int k = 3;

    // 测试
    Mat result(test_sample_count, 1, CV_32FC1);
    // 在训练样本中寻找最接近待分类样本的前K个样本,并返回K个样本中数量最多类型的标签。
    knn->findNearest(testData, k, result);
    int t = 0;
    int f = 0;
    for (int i = 0; i < test_sample_count; i++)
    {
        int predict = (int)result.at<float>(i);
        int actual = (int)testLabel.at<float>(i);
        if (predict == actual)
        {
            cout << "正确:" << predict << "-" << actual << endl;
            t++;
        }
        else
        {
            cout << "错误------:" << predict << "-" << actual << endl;
            f++;
        }
    }

    double accuracy = (t * 1.0) / (t + f);
    cout << "准确率:" << accuracy << endl;
}

int main()
{
    //demo1();
    demo2();
    return 0;
}
Python版本代码如下:
import numpy as np
import cv2

img = cv2.imread('../images/digits.png')
gray = cv2.cvtColor(img, cv2.COLOR_BGR2GRAY)

# Now we split the image to 5000 cells, each 20x20 size
cells = [np.hsplit(row, 100) for row in np.vsplit(gray, 50)]

# Make it into a Numpy array. It size will be (50,100,20,20)
x = np.array(cells)
# Now we prepare train_data and test_data.
train = x[:, :50].reshape(-1, 400).astype(np.float32)  # Size = (2500,400)
test = x[:, 50:100].reshape(-1, 400).astype(np.float32)  # Size = (2500,400)

# Create labels for train and test data
k = np.arange(10)
train_labels = np.repeat(k, 250)[:, np.newaxis]
test_labels = train_labels.copy()

# Initiate kNN, train the data, then test it with test data for k=1
knn = cv2.ml.KNearest_create()
knn.train(train, cv2.ml.ROW_SAMPLE, train_labels)
ret, result, neighbours, dist = knn.findNearest(test, k=5)

# Now we check the accuracy of classification
# For that, compare the result with test_labels and check which are wrong
matches = result == test_labels
correct = np.count_nonzero(matches)
accuracy = correct * 100.0 / result.size
print('准确率', accuracy)  # 准确率91.76%

# save the data
np.savez('knn_data.npz', train=train, train_labels=train_labels, test=test, test_labels=test_labels)

# Now load the data
with np.load('knn_data_num.npz') as data:
    print(data.files)
    train = data['train']
    train_labels = data['train_labels']
    test = data['test']
    test_labels = data['test_labels']

# TODO 怎样预测数字?
retval, results = knn.predict(test[1003:1005])
# Docstring: predict(samples[, results[, flags]]) -> retval, results
print(retval, results)  # (4.0, array([[ 4.],[ 4.]], dtype=float32))
# 对比
cv2.imwrite('test[1005].jpg', test[1005].reshape((20, 20)))
using OpenCvSharp;
using System;
using System.Collections.Generic;
using System.Linq;

namespace demo
{
    internal class Program
    {
        static void Main(string[] args)
        {
            demo1();
            //demo2();
        }

        /// <summary>
        /// 切图
        /// </summary>
        /// <returns></returns>
        static List<List<Mat>> RoiImages(string path)
        {
            Mat img = Cv2.ImRead(path);
            Mat gray = new Mat();
            Cv2.CvtColor(img, gray, ColorConversionCodes.BGR2GRAY);

            List<List<Mat>> cells = new List<List<Mat>>();
            int w = gray.Width / 100; // 每行100个字符
            int h = gray.Height / 50; // 共50行
            Mat roi = new Mat();
            for (int i = 0; i < 10; i++) // 数字0~9
            {
                cells.Add(new List<Mat>());
                for (int j = 0; j < 5; j++) // 每组数字有5行
                {
                    for (int n = 0; n < 100; n++) // 每行100个字符
                    {
                        Rect rect = new Rect()
                        {
                            X = n * w,
                            Y = h * ((i * 5) + j),
                            Width = w,
                            Height = h
                        };
                        roi = new Mat(gray, rect);
                        cells[i].Add(roi);

                        //Console.WriteLine(rect);
                        //Cv2.ImShow("roi", roi);
                        //Cv2.WaitKey(1);
                    }
                }
            }
            return cells;
        }

        /// <summary>
        /// 模型训练
        /// </summary>
        static void demo1()
        {
            // 切图
            var cells = RoiImages("../../../images/digits.png");

            // 训练数据数量,前400张图片用来训练
            int train_sample_count = 400 * 10;
            // 测试数据数量,后100张图片用来测试
            int test_sample_count = 100 * 10;
            // 声明训练数据集合 mat,图像尺寸:20*20
            Mat trainData = new Mat(train_sample_count, 20 * 20, MatType.CV_32FC1);
            // 声明测试数据集合 mat
            Mat testData = new Mat(test_sample_count, 20 * 20, MatType.CV_32FC1);
            // 声明训练数据标签 mat
            Mat trainLabel = new Mat(train_sample_count, 1, MatType.CV_32FC1);
            // 声明测试数据标签 mat
            Mat testLabel = new Mat(test_sample_count, 1, MatType.CV_32FC1);

            // 组织训练数据,循环训练文件夹内所有图片。
            int trainNum = 0;
            for (int i = 0; i < 10; i++)
            {
                var cell = cells[i].Take(400);
                foreach (Mat temp in cell)
                {
                    // 转换CV_32FC1,因为下面训练函数需要这个格式
                    temp.ConvertTo(temp, MatType.CV_32FC1);
                    // 写入到训练数据集合的mat内,注意reshape的用法。
                    /*
                    reshape有两个参数:
                    其中,参数:cn为新的通道数,如果cn = 0,表示通道数不会改变。
                    参数rows为新的行数,如果rows = 0,表示行数不会改变。
                    注意:新的行* 列必须与原来的行*列相等。就是说,如果原来是5行3列,新的行和列可以是1行15列,3行5列,5行3列,15行1列。
                          设置行数后,列数会自动调整。比如此处 调整为 1行784列。
                    */
                    temp.Reshape(0, 1).CopyTo(trainData.Row(trainNum));
                    // 写入到训练标签集合的mat内
                    trainLabel.Set<float>(trainNum, i);
                    trainNum++;
                }
            }

            // 组织测试数据
            int testNum = 0;
            for (int i = 0; i < 10; i++)
            {
                var cell = cells[i].Skip(400);
                foreach (Mat temp in cell)
                {
                    temp.ConvertTo(temp, MatType.CV_32FC1);
                    temp.Reshape(0, 1).CopyTo(testData.Row(testNum));
                    testLabel.Set<float>(testNum, i);
                    testNum++;
                }
            }

            // 创建knn模型
            OpenCvSharp.ML.KNearest knn = OpenCvSharp.ML.KNearest.Create();
            // k 可以根据需要自行调整
            int k = 3;
            // 设置K值
            knn.DefaultK = k;
            // 设置KNN是进行分类还是回归
            knn.IsClassifier = true;
            // 设置算法类型 BruteForce 或 KdTree
            knn.AlgorithmType = OpenCvSharp.ML.KNearest.Types.BruteForce;
            // 训练
            knn.Train(trainData, OpenCvSharp.ML.SampleTypes.RowSample, trainLabel);

            // 训练完成之后,可以用knn.Save()保存模型文件。
            knn.Save("knn_digits.yml");

            // 测试
            Mat result = new Mat(test_sample_count, 1, MatType.CV_32FC1);
            knn.FindNearest(testData, k, result);
            int t = 0;
            int f = 0;
            for (int i = 0; i < test_sample_count; i++)
            {
                int predict = (int)result.At<float>(i);
                int actual = (int)testLabel.At<float>(i);
                if (predict == actual)
                {
                    Console.WriteLine("正确:" + predict + "-" + actual);
                    t++;
                }
                else
                {
                    Console.WriteLine("错误------:" + predict + "-" + actual);
                    f++;
                }
            }

            double accuracy = (t * 1.0) / (t + f);
            Console.WriteLine("准确率:" + accuracy);
            Console.Read();
        }

        /// <summary>
        /// 模型加载与测试
        /// </summary>
        static void demo2()
        {
            // 测试数据数量
            int test_sample_count = 100 * 10;
            // 声明测试数据集合 mat,
            Mat testData = new Mat(test_sample_count, 20 * 20, MatType.CV_32FC1);
            // 声明测试数据标签 mat
            Mat testLabel = new Mat(test_sample_count, 1, MatType.CV_32FC1);

            // 创建knn模型
            OpenCvSharp.ML.KNearest knn = OpenCvSharp.ML.KNearest.Load("knn_digits.yml");

            // 读取测试切图
            var cells = RoiImages("../../../images/digits.png");

            // 组织测试数据
            int testNum = 0;
            for (int i = 0; i < 10; i++)
            {
                var cell = cells[i].Skip(400);
                foreach (Mat temp in cell)
                {
                    temp.ConvertTo(temp, MatType.CV_32FC1);
                    temp.Reshape(0, 1).CopyTo(testData.Row(testNum));
                    testLabel.Set<float>(testNum, i);
                    testNum++;
                }
            }

            int k = 3;

            // 测试
            Mat result = new Mat(test_sample_count, 1, MatType.CV_32FC1);
            // 在训练样本中寻找最接近待分类样本的前K个样本,并返回K个样本中数量最多类型的标签。
            knn.FindNearest(testData, k, result);
            int t = 0;
            int f = 0;
            for (int i = 0; i < test_sample_count; i++)
            {
                int predict = (int)result.At<float>(i);
                int actual = (int)testLabel.At<float>(i);

                if (predict == actual)
                {
                    Console.WriteLine("正确:" + predict + "-" + actual);
                    t++;
                }
                else
                {
                    Console.WriteLine("错误------:" + predict + "-" + actual);
                    f++;
                }
            }

            double accuracy = (t * 1.0) / (t + f);
            Console.WriteLine("准确率:" + accuracy);
            Console.Read();
        }
    }
}
C++版本代码如下:
#include <opencv2/core/core.hpp>
#include <opencv2/highgui/highgui.hpp>
#include <opencv2/imgproc/imgproc.hpp>
#include <opencv2/ml/ml.hpp>

using namespace cv;
using namespace std;

// 切图
vector<vector<Mat>> RoiImages(string path)
{
    Mat img = cv::imread(path);
    Mat gray;
    cv::cvtColor(img, gray, COLOR_BGR2GRAY);

    vector<vector<Mat>> cells;
    int w = gray.cols / 100; // 每行100个字符
    int h = gray.rows / 50; // 共50行
    for (int i = 0; i < 10; i++) // 数字0~9
    {
        vector<Mat> imgs;
        for (int j = 0; j < 5; j++) // 每组数字有5行
        {
            for (int n = 0; n < 100; n++) // 每行100个字符
            {
                Rect rect(n * w, h * ((i * 5) + j), w, h);
                Mat roi = gray(rect);
                imgs.push_back(roi);
                //cv::imshow("roi", roi);
                //cv::waitKey(1);
            }
        }
        cells.push_back(imgs);
    }
    return cells;
}

// 模型训练
void demo1()
{
    // 切图
    vector<vector<Mat>> cells = RoiImages("../images/digits.png");

    // 训练数据数量,前400张图片用来训练
    int train_sample_count = 400 * 10;
    // 测试数据数量,后100张图片用来测试
    int test_sample_count = 100 * 10;
    // 声明训练数据集合 mat,图像尺寸:20*20
    Mat trainData(train_sample_count, 20 * 20, CV_32FC1);
    // 声明测试数据集合 mat
    Mat testData(test_sample_count, 20 * 20, CV_32FC1);
    // 声明训练数据标签 mat
    Mat trainLabel(train_sample_count, 1, CV_32FC1);
    // 声明测试数据标签 mat
    Mat testLabel(test_sample_count, 1, CV_32FC1);

    // 组织训练数据,循环训练文件夹内所有图片。
    int trainNum = 0;
    for (int i = 0; i < 10; i++)
    {
        for (int j = 0; j < 400; j++)
        {
            Mat temp = cells[i][j];
            // 转换CV_32FC1,因为下面训练函数需要这个格式
            temp.convertTo(temp, CV_32FC1);
            // 写入到训练数据集合的mat内,注意reshape的用法。
            /*
            reshape有两个参数:
            其中,参数:cn为新的通道数,如果cn = 0,表示通道数不会改变。
            参数rows为新的行数,如果rows = 0,表示行数不会改变。
            注意:新的行* 列必须与原来的行*列相等。就是说,如果原来是5行3列,新的行和列可以是1行15列,3行5列,5行3列,15行1列。
                  设置行数后,列数会自动调整。比如此处 调整为 1行784列。
            */
            temp.reshape(0, 1).copyTo(trainData.row(trainNum));
            // 写入到训练标签集合的mat内
            trainLabel.at<float>(trainNum) = i;
            trainNum++;
        }
    }

    // 组织测试数据
    int testNum = 0;
    for (int i = 0; i < 10; i++)
    {
        for (int j = 400; j < cells[i].size(); j++)
        {
            Mat temp = cells[i][j];
            temp.convertTo(temp, CV_32FC1);
            temp.reshape(0, 1).copyTo(testData.row(testNum));
            testLabel.at<float>(testNum) = i;
            testNum++;
        }
    }

    // 创建knn模型
    Ptr<ml::KNearest> knn = ml::KNearest::create();
    // k 可以根据需要自行调整
    int k = 3;
    knn->setDefaultK(k);
    // 设置KNN是进行分类还是回归
    knn->setIsClassifier(true);
    // 设置算法类型 BruteForce 或 KdTree
    knn->setAlgorithmType(ml::KNearest::Types::BRUTE_FORCE);
    // 训练
    knn->train(trainData, ml::SampleTypes::ROW_SAMPLE, trainLabel);
    // 训练完成之后,可以用knn.Save()保存模型文件。
    knn->save("knn_digits.yml");

    // 测试
    Mat result(test_sample_count, 1, CV_32FC1);
    knn->findNearest(testData, k, result);
    int t = 0;
    int f = 0;
    for (int i = 0; i < test_sample_count; i++)
    {
        int predict = (int)result.at<float>(i);
        int actual = (int)testLabel.at<float>(i);
        if (predict == actual)
        {
            cout << "正确:" << predict << "-" << actual << endl;
            t++;
        }
        else
        {
            cout << "错误------:" << predict << "-" << actual << endl;
            f++;
        }
    }

    double accuracy = (t * 1.0) / (t + f);
    cout << "准确率:" << accuracy << endl;
}

// 模型加载与测试
void demo2()
{
    // 测试数据数量
    int test_sample_count = 100 * 10;
    // 声明测试数据集合 mat,
    Mat testData(test_sample_count, 20 * 20, CV_32FC1);
    // 声明测试数据标签 mat
    Mat testLabel(test_sample_count, 1, CV_32FC1);

    // 创建knn模型
    Ptr<ml::KNearest> knn = ml::KNearest::load("knn_digits.yml");

    // 切图
    vector<vector<Mat>> cells = RoiImages("../images/digits.png");

    // 组织测试数据
    int testNum = 0;
    for (int i = 0; i < 10; i++)
    {
        for (int j = 400; j < cells[i].size(); j++)
        {
            Mat temp = cells[i][j];
            temp.convertTo(temp, CV_32FC1);
            temp.reshape(0, 1).copyTo(testData.row(testNum));
            testLabel.at<float>(testNum) = i;
            testNum++;
        }
    }

    int k = 3;

    // 测试
    Mat result(test_sample_count, 1, CV_32FC1);
    // 在训练样本中寻找最接近待分类样本的前K个样本,并返回K个样本中数量最多类型的标签。
    knn->findNearest(testData, k, result);
    int t = 0;
    int f = 0;
    for (int i = 0; i < test_sample_count; i++)
    {
        int predict = (int)result.at<float>(i);
        int actual = (int)testLabel.at<float>(i);
        if (predict == actual)
        {
            cout << "正确:" << predict << "-" << actual << endl;
            t++;
        }
        else
        {
            cout << "错误------:" << predict << "-" << actual << endl;
            f++;
        }
    }

    double accuracy = (t * 1.0) / (t + f);
    cout << "准确率:" << accuracy << endl;
}

int main()
{
    //demo1();
    demo2();
    return 0;
}
Python版本代码如下:
import numpy as np
import cv2

img = cv2.imread('../images/digits.png')
gray = cv2.cvtColor(img, cv2.COLOR_BGR2GRAY)

# Now we split the image to 5000 cells, each 20x20 size
cells = [np.hsplit(row, 100) for row in np.vsplit(gray, 50)]

# Make it into a Numpy array. It size will be (50,100,20,20)
x = np.array(cells)
# Now we prepare train_data and test_data.
train = x[:, :50].reshape(-1, 400).astype(np.float32)  # Size = (2500,400)
test = x[:, 50:100].reshape(-1, 400).astype(np.float32)  # Size = (2500,400)

# Create labels for train and test data
k = np.arange(10)
train_labels = np.repeat(k, 250)[:, np.newaxis]
test_labels = train_labels.copy()

# Initiate kNN, train the data, then test it with test data for k=1
knn = cv2.ml.KNearest_create()
knn.train(train, cv2.ml.ROW_SAMPLE, train_labels)
ret, result, neighbours, dist = knn.findNearest(test, k=5)

# Now we check the accuracy of classification
# For that, compare the result with test_labels and check which are wrong
matches = result == test_labels
correct = np.count_nonzero(matches)
accuracy = correct * 100.0 / result.size
print('准确率', accuracy)  # 准确率91.76%

# save the data
np.savez('knn_data.npz', train=train, train_labels=train_labels, test=test, test_labels=test_labels)

# Now load the data
with np.load('knn_data_num.npz') as data:
    print(data.files)
    train = data['train']
    train_labels = data['train_labels']
    test = data['test']
    test_labels = data['test_labels']

# TODO 怎样预测数字?
retval, results = knn.predict(test[1003:1005])
# Docstring: predict(samples[, results[, flags]]) -> retval, results
print(retval, results)  # (4.0, array([[ 4.],[ 4.]], dtype=float32))
# 对比
cv2.imwrite('test[1005].jpg', test[1005].reshape((20, 20)))