SURF/SIFT特征描述
视频讲解如下:
在本章节中给大家演示SURF/SIFT特征描述,主要函数:SURF和SIFT。
毛星云的代码为opencv-2.4.9版本的SURF功能演示,可是博主在opencv-2.4.9版本中并未发现SURF功能,目前只能演示SIFT了。
C#、C++版本中提供了Detect和DetectAndCompute两种算法,效果其实也都差不多,博主代码中两种操作方法都提供了,Python版本中好像好像无法使用Detect,执行后返回结果是空的。。。
当前系列所有demo下载地址:
https://github.com/GaoRenBao/OpenCv4-Demo
不同编程语言对应的OpenCv版本以及开发环境信息如下:
语言 | OpenCv版本 | IDE |
C# | OpenCvSharp4.4.8.0.20230708 | Visual Studio 2022 |
C++ | OpenCv-4.5.5-vc14_vc15 | Visual Studio 2022 |
Python | OpenCv-Python (4.6.0.66) | PyCharm Community Edition 2022.1.3 |
首先呢,我们需要准备两张测试图片。(不想下载工程的童鞋,可直接复制下面的图片和代码)


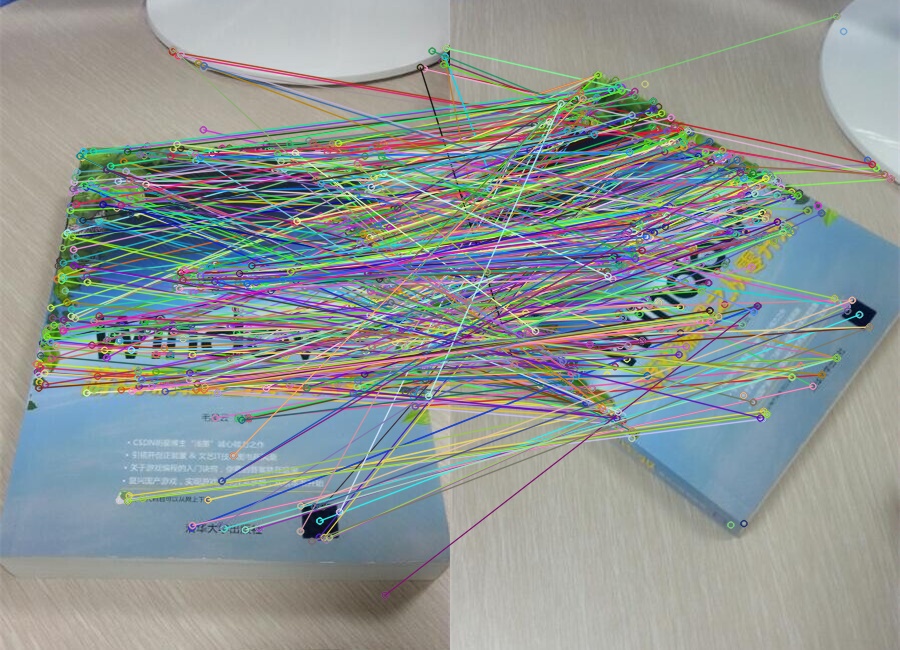
C++ SIFT版本运行效果如下(其他版本效果也差不多):

C#版本代码如下:
using OpenCvSharp;

namespace demo
{
    internal class Program
    {
        static void Main(string[] args)
        {
            demo1();
            demo2();
            Cv2.WaitKey();
        }

        /// <summary>
        /// SURF
        /// </summary>
        static void demo1()
        {
            // 载入源图片并显示
            Mat srcImage1 = Cv2.ImRead("../../../images/book2.jpg");
            Mat srcImage2 = Cv2.ImRead("../../../images/book3.jpg");

            // 定义SURF中的hessian阈值特征点检测算子
            int minHessian = 700;
            // 定义一个特征检测类对象
            var MySurf = OpenCvSharp.XFeatures2D.SURF.Create(minHessian, 4, 3, true, true);

            Mat descriptors1 = new Mat();
            Mat descriptors2 = new Mat();

            // 模板类是能够存放任意类型的动态数组,能够增加和压缩数据
            // 方法1:计算描述符(特征向量),将Detect和Compute操作分开
            //KeyPoint[] keyPoint1 = MySurf.Detect(srcImage1);
            //KeyPoint[] keyPoint2 = MySurf.Detect(srcImage2);
            //MySurf.Compute(srcImage1, ref keyPoint1, descriptors1);
            //MySurf.Compute(srcImage2, ref keyPoint2, descriptors2);

            // 方法2:计算描述符(特征向量),将Detect和Compute操作合并
            KeyPoint[] keyPoint1, keyPoint2;
            MySurf.DetectAndCompute(srcImage1, null, out keyPoint1, descriptors1);
            MySurf.DetectAndCompute(srcImage2, null, out keyPoint2, descriptors2);

            // 使用BruteForce进行匹配
            // 创建特征点匹配器
            BFMatcher matcher = new BFMatcher();
            // 匹配两幅图中的描述子(descriptors)
            DMatch[] matches = matcher.Match(descriptors1, descriptors2);

            //【6】绘制从两个图像中匹配出的关键点
            Mat imgMatches = new Mat();
            Cv2.DrawMatches(srcImage1, keyPoint1, srcImage2, keyPoint2, matches, imgMatches);//进行绘制

            // 显示效果图
            Cv2.ImShow("SURF匹配图", imgMatches);
        }

        /// <summary>
        /// SIFT
        /// </summary>
        static void demo2()
        {
            // 载入源图片并显示
            Mat srcImage1 = Cv2.ImRead("../../../images/book2.jpg");
            Mat srcImage2 = Cv2.ImRead("../../../images/book3.jpg");

            // 定义SURF中的hessian阈值特征点检测算子
            int minHessian = 700;
            // 定义一个特征检测类对象
            var MySift = OpenCvSharp.Features2D.SIFT.Create(minHessian);

            Mat descriptors1 = new Mat();
            Mat descriptors2 = new Mat();

            // 模板类是能够存放任意类型的动态数组,能够增加和压缩数据
            // 方法1:计算描述符(特征向量),将Detect和Compute操作分开
            //KeyPoint[] keyPoint1 = MySift.Detect(srcImage1);
            //KeyPoint[] keyPoint2 = MySift.Detect(srcImage2);
            //MySift.Compute(srcImage1, ref keyPoint1, descriptors1);
            //MySift.Compute(srcImage2, ref keyPoint2, descriptors2);

            // 方法2:计算描述符(特征向量),将Detect和Compute操作合并
            KeyPoint[] keyPoint1, keyPoint2;
            MySift.DetectAndCompute(srcImage1, null, out keyPoint1, descriptors1);
            MySift.DetectAndCompute(srcImage2, null, out keyPoint2, descriptors2);

            // 使用BruteForce进行匹配
            // 创建特征点匹配器
            BFMatcher matcher = new BFMatcher();
            // 匹配两幅图中的描述子(descriptors)
            DMatch[] matches = matcher.Match(descriptors1, descriptors2);

            //【6】绘制从两个图像中匹配出的关键点
            Mat imgMatches = new Mat();
            Cv2.DrawMatches(srcImage1, keyPoint1, srcImage2, keyPoint2, matches, imgMatches);//进行绘制

            // 显示效果图
            Cv2.ImShow("SIFT匹配图", imgMatches);
        }
    }
}
C++版本代码如下:
#include <iostream>
#include <opencv2/opencv.hpp>
#include <opencv2/core/core.hpp>
#include <opencv2/features2d.hpp>
#include <opencv2/highgui/highgui.hpp>
#include <opencv2/features2d/features2d.hpp>

using namespace cv;
using namespace std;

int main()
{
	//【0】改变console字体颜色
	system("color 1F");

	//【1】载入素材图
	Mat srcImage1 = imread("../images/book2.jpg");
	Mat srcImage2 = imread("../images/book3.jpg");
	if (!srcImage1.data || !srcImage2.data)
	{
		printf("读取图片错误,请确定目录下是否有imread函数指定的图片存在~! \n"); return false;
	}

	//【2】定义SIFT中的hessian阈值特征点检测算子
	int minHessian = 700;
	Ptr<SIFT> siftDetector = SIFT::create(minHessian);
	//vector模板类,存放任意类型的动态数组
	vector<KeyPoint> keyPoint1, keyPoint2;
	Mat descriptors1, descriptors2;

	//【4】方法1:计算描述符(特征向量),将Detect和Compute操作分开
	siftDetector->detect(srcImage1, keyPoint1);
	siftDetector->detect(srcImage2, keyPoint2);
	siftDetector->compute(srcImage1, keyPoint1, descriptors1);
	siftDetector->compute(srcImage2, keyPoint2, descriptors2);

	//【4】方法2:计算描述符(特征向量),将Detect和Compute操作合并
	//siftDetector->detectAndCompute(srcImage1, cv::Mat(), keyPoint1, descriptors1);
	//siftDetector->detectAndCompute(srcImage2, cv::Mat(), keyPoint2, descriptors2);

	//【5】使用BruteForce进行匹配
        // 创建特征点匹配器
	Ptr<BFMatcher> matcher = BFMatcher::create();
	// 匹配两幅图中的描述子(descriptors)
	vector<DMatch> matches;
	matcher->match(descriptors1, descriptors2, matches);

	//【6】绘制从两个图像中匹配出的关键点
	Mat imgMatches;
	drawMatches(srcImage1, keyPoint1, srcImage2, keyPoint2, matches, imgMatches);//进行绘制

	 //【7】显示效果图
	imshow("匹配图", imgMatches);
	waitKey(0);
	return 0;
}
Python版本代码如下:
import cv2
import numpy as np

# 【1】载入图像
srcImage1 = cv2.imread("../images/book2.jpg")
srcImage2 = cv2.imread("../images/book3.jpg")

# 定义一个特征检测类对象
sift = cv2.SIFT_create(700)
# 调用detect函数检测出SIFT特征关键点,保存在vector容器中

# 方法1:计算描述符(特征向量),将Detect和Compute操作分开
keyPoint1 = sift.detect(srcImage1)
keyPoint2 = sift.detect(srcImage2)
(keypoints1, descriptors1) = sift.compute(srcImage1, keyPoint1)
(keypoints2, descriptors2) = sift.compute(srcImage2, keyPoint2)

# 方法2:计算描述符(特征向量),将Detect和Compute操作合并
#(keyPoint1, descriptors1) = sift.detectAndCompute(srcImage1, None)
#(keyPoint2, descriptors2) = sift.detectAndCompute(srcImage2, None)

matcher = cv2.BFMatcher() #建立匹配关系
matches=matcher.match(descriptors1,descriptors2) #匹配描述子
matches=sorted(matches,key=lambda x:x.distance)  #据距离来排序

#画出匹配关系
outImg = None
imgMatches = cv2.drawMatches(srcImage1, keyPoint1,srcImage2,keyPoint2,matches, outImg = None)
#imgMatches = cv2.drawMatches(srcImage1, keyPoint1,srcImage2,keyPoint2,mathces[:40], outImg = None)

cv2.imshow("imgMatches", imgMatches)
cv2.waitKey(0)
cv2.destroyAllWindows()


