椭圆拟合与直线拟合
本章节内容是博主网上收集的,PDF原文下载地址如下:
OpenCV-Python-Tutorial-中文版.pdf(P109 椭圆拟合)
在线预览
当前系列所有demo下载地址:
https://github.com/GaoRenBao/OpenCv4-Demo
不同编程语言对应的OpenCv版本以及开发环境信息如下:
语言 | OpenCv版本 | IDE |
C# | OpenCvSharp4.4.8.0.20230708 | Visual Studio 2022 |
C++ | OpenCv-4.5.5-vc14_vc15 | Visual Studio 2022 |
Python | OpenCv-Python (4.6.0.66) | PyCharm Community Edition 2022.1.3 |
测试原图如下:

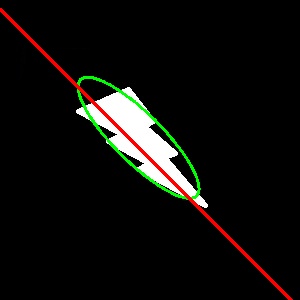
运行效果如下:

C#版本运行代码如下:
using OpenCvSharp;
using System;

namespace ConsoleApp
{
    internal class Program
    {
        static void Main(string[] args)
        {
            Mat rImg = Cv2.ImRead("../../../images/lightning.png");
            Mat img = new Mat();
            Cv2.CvtColor(rImg, img, ColorConversionCodes.BGR2GRAY);

            Mat thresh = new Mat();
            Cv2.Threshold(img, thresh, 127, 255, ThresholdTypes.Binary);

            Point[][] contours = new Point[][] { };
            HierarchyIndex[] hierarcy;
            Cv2.FindContours(thresh, out contours, out hierarcy, RetrievalModes.Tree, ContourApproximationModes.ApproxSimple, null);
            Console.WriteLine($"contours len:{contours.Length}");
            Point[] cnt = contours[0];

            // 椭圆拟合
            // 使用的函数为 cv2.ellipse()  返回值其实就是旋转边界矩形的内切圆
            RotatedRect ellipse = Cv2.FitEllipse(cnt);
            float angle = ellipse.Angle;
            Cv2.Ellipse(rImg, ellipse, new Scalar(0, 255, 0), 2);

            // 直线拟合
            // 我们可以根据一组点拟合出一条直线 同样我们也可以为图像中的白色点 拟合出一条直线。
            Line2D line = Cv2.FitLine(cnt, DistanceTypes.L2, 0, 0.01, 0.01);
            int lefty = (int)((-line.X1 * line.Vy / line.Vx) + line.Y1);
            int righty = (int)(((img.Cols - line.X1) * line.Vy / line.Vx) + line.Y1);
            Cv2.Line(rImg, new Point(img.Cols - 1, righty), new Point(0, lefty), new Scalar(0, 0, 255), 2);

            Cv2.ImShow("rImg", rImg);
            Cv2.WaitKey(0);
        }
    }
}
C++版本运行代码如下:
#include <opencv2/opencv.hpp>
#include <opencv2/cvconfig.h>
#include <opencv2/imgproc/imgproc.hpp>
#include <opencv2/highgui/highgui.hpp>

#include <string>
#include <cmath>
#include <iostream>

using namespace cv;
using namespace std;

int main()
{
    Mat rImg = cv::imread("../images/lightning.png");
    Mat img;
    cv::cvtColor(rImg, img, COLOR_BGR2GRAY);

    Mat thresh;
    cv::threshold(img, thresh, 127, 255, THRESH_BINARY);

    vector<vector<Point>> contours;
    vector<Vec4i> hierarcy;
    cv::findContours(thresh, contours, hierarcy, RETR_CCOMP, CHAIN_APPROX_NONE, Point(0, 0));
    cout << "contours len:" << contours.size() << endl;
    vector<Point> cnt = contours[0];

    // 椭圆拟合
    // 使用的函数为 cv::ellipse()  返回值其实就是旋转边界矩形的内切圆
    RotatedRect ellipse = cv::fitEllipse(cnt);
    float angle = ellipse.angle;
    cv::ellipse(rImg, ellipse, Scalar(0, 255, 0), 2);

    // 直线拟合
    // 我们可以根据一组点拟合出一条直线 同样我们也可以为图像中的白色点 拟合出一条直线。
    cv::Vec4f line;
    cv::fitLine(cnt, line, cv::DIST_L2, 0, 0.01, 0.01);
    int lefty = (int)((-line[2] * line[1] / line[0]) + line[3]);
    int righty = (int)(((img.cols - line[2]) * line[1] / line[0]) + line[3]);
    cv::line(rImg, Point(img.cols - 1, righty), Point(0, lefty), Scalar(0, 0, 255), 2);

    cv::imshow("rImg", rImg);
    cv::waitKey(0);
}
Python版本运行效果如下:
import cv2
import numpy as np

rImg = cv2.imread('../images/lightning.png')
img = cv2.cvtColor(rImg,cv2.COLOR_BGR2GRAY)
ret, thresh = cv2.threshold(img, 127, 255, 0)
contours, hierarchy = cv2.findContours(thresh, cv2.RETR_TREE, cv2.CHAIN_APPROX_SIMPLE)
print('contours len:', len(contours))
cnt = contours[0]

# 椭圆拟合
# 使用的函数为 cv2.ellipse()  返回值其实就是旋转边界矩形的内切圆
ellipse = cv2.fitEllipse(cnt)
angle=ellipse[2]
im = cv2.ellipse(rImg, ellipse, (0, 255, 0), 2)

# 直线拟合
# 我们可以根据一组点拟合出一条直线 同样我们也可以为图像中的白色点拟合出一条直线。
rows, cols = img.shape[:2]
[vx, vy, x, y] = cv2.fitLine(cnt, cv2.DIST_L2, 0, 0.01, 0.01)
lefty = int((-x * vy / vx) + y)
righty = int(((cols - x) * vy / vx) + y)
cv2.line(rImg, (cols - 1, righty), (0, lefty), (0, 0, 255), 2)

cv2.imshow('rImg', rImg)
cv2.imwrite('rImg.jpg', rImg)
cv2.waitKey(0)


