角点检测的FAST算法(FAST特征检测器)
当前系列所有demo下载地址:
https://github.com/GaoRenBao/OpenCv4-Demo
源码参考原文:
OpenCV-Python-Tutorial-中文版.pdf (P202)
不同编程语言对应的OpenCv版本以及开发环境信息如下:
语言 | OpenCv版本 | IDE |
C# | OpenCvSharp4.4.8.0.20230708 | Visual Studio 2022 |
C++ | OpenCv-4.5.5-vc14_vc15 | Visual Studio 2022 |
Python | OpenCv-Python (4.6.0.66) | PyCharm Community Edition 2022.1.3 |
测试原图如下:

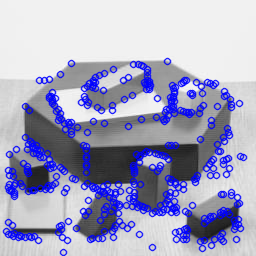
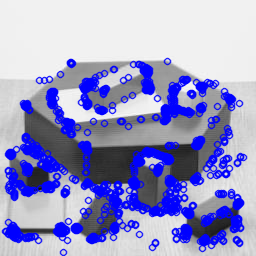
运行效果如下:
fast_true.png(左)、fast_false.png(右)


C#版本代码如下:

源码如下:
using OpenCvSharp;
using System;

namespace demo
{
    internal class Program
    {
        static void Main(string[] args)
        {
            Mat img = Cv2.ImRead("../../../images/blox.jpg");

            // Initiate FAST object with default values
            FastFeatureDetector fast = FastFeatureDetector.Create();
            // find and draw the keypoints
            KeyPoint[] kp = fast.Detect(img);
            var img2 = new Mat();
            Cv2.DrawKeypoints(img, kp, img2, Scalar.FromRgb(0, 0, 255));
            // Print all default params
            Console.WriteLine($"Threshold: {fast.Threshold}");
            Console.WriteLine($"nonmaxSuppression: {fast.NonmaxSuppression}");
            Console.WriteLine($"neighborhood: {fast.GetType()}");
            Console.WriteLine($"Total Keypoints with nonmaxSuppression: {kp.Length}");
            Cv2.ImShow("fast_true.png", img2);

            // Disable nonmaxSuppression
            fast.NonmaxSuppression = false;
            kp = fast.Detect(img);
            Console.WriteLine($"Total Keypoints without nonmaxSuppression: {kp.Length}");


            var img3 = new Mat();
            Cv2.DrawKeypoints(img, kp, img3, Scalar.FromRgb(0, 0, 255));
            Cv2.ImShow("fast_false.png", img3);
            Cv2.WaitKey(0);

            // 第一幅图是使用了非最大值抑制的结果
            // 第二幅没有使用非最大值抑制。
        }
    }
}
C++版本代码如下:

源码如下:
#include <opencv2/opencv.hpp>
#include <opencv2/features2d.hpp>
#include <opencv2/core/utils/logger.hpp>
#include <iostream>

using namespace cv;
using namespace std;

int main()
{
    // 关闭opencv日志
    cv::utils::logging::setLogLevel(cv::utils::logging::LOG_LEVEL_SILENT);

    Mat img = cv::imread("../images/blox.jpg", 0);

    // Initiate FAST object with default values
    cv::Ptr<cv::FastFeatureDetector> fast = cv::FastFeatureDetector::create();

    // find and draw the keypoints
    std::vector<cv::KeyPoint> kp;
    fast->detect(img, kp);

    cv::Mat img2;
    cv::drawKeypoints(img, kp, img2, Scalar(255,0,0));
    // Print all default params
    cout << "Threshold:" << fast->getThreshold() << endl;
    cout << "nonmaxSuppression:" << fast->getNonmaxSuppression() << endl;
    cout << "neighborhood:" << fast->getType() << endl;
    cout << "Total Keypoints with nonmaxSuppression:" << kp.size() << endl;
    cv::imshow("fast_true.png", img2);

    // Disable nonmaxSuppression
    fast->setNonmaxSuppression(false);
    fast->detect(img, kp);
    cout << "Total Keypoints without nonmaxSuppression:" << kp.size() << endl;

    cv::Mat img3;
    cv::drawKeypoints(img, kp, img3, Scalar(255, 0, 0));
    cv::imshow("fast_false.png", img3);
    // 第一幅图是使用了非最大值抑制的结果
    // 第二幅没有使用非最大值抑制。
    cv::waitKey(0);
}
Python版本代码如下:

源码如下:
import cv2

img = cv2.imread('../images/blox.jpg', 0)

# Initiate FAST object with default values
fast = cv2.FastFeatureDetector_create()
# find and draw the keypoints
kp = fast.detect(img, None)
img2 = cv2.drawKeypoints(img, kp, None, color=(255, 0, 0))

# Print all default params
print("Threshold: ", fast.getThreshold())
print("nonmaxSuppression: ", fast.getNonmaxSuppression())
print("neighborhood: ", fast.getType())
print("Total Keypoints with nonmaxSuppression: ", len(kp))
cv2.imshow('fast_true.png', img2)

# Disable nonmaxSuppression
fast.setNonmaxSuppression(0)
kp = fast.detect(img, None)
print("Total Keypoints without nonmaxSuppression: ", len(kp))

img3 = cv2.drawKeypoints(img, kp, None, color=(255, 0, 0))
cv2.imshow('fast_false.png', img3)
cv2.waitKey(0)

# 第一幅图是使用了非最大值抑制的结果
# 第二幅没有使用非最大值抑制。


