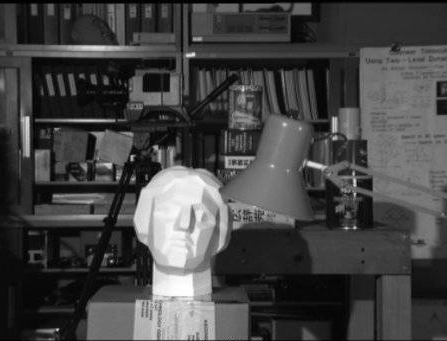
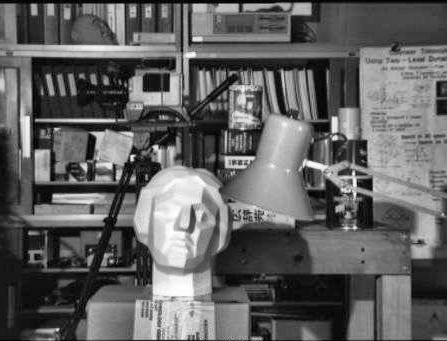
<h1 style="font-size: 32px; font-weight: bold; border-bottom: 2px solid rgb(204, 204, 204); padding: 0px 4px 0px 0px; text-align: left; margin: 0px 0px 10px;">CLAHE有限对比适应性直方图均衡化</h1><p style="white-space: normal;">本章节内容是博主网上收集的,PDF原文下载地址如下<span style=" color: rgb(51, 51, 51); font-family: "Helvetica Neue", Helvetica, "PingFang SC", "Hiragino Sans GB", "Microsoft YaHei", "Noto Sans CJK SC", "WenQuanYi Micro Hei", Arial, sans-serif;">:</span></p><p style="white-space: normal;"><a href="/api/system/download?file=OpenCV-Python-Tutorial-%E4%B8%AD%E6%96%87%E7%89%88.pdf" target="_blank">OpenCV-Python-Tutorial-中文版.pdf(P132 CLAHE有限对比适应性直方图均衡化)</a></p><p style="white-space: normal;"><a href="/upload/file/OpenCV-Python-Tutorial-%E4%B8%AD%E6%96%87%E7%89%88.pdf" target="_blank" title="在线预览">在线预览</a></p><p style="white-space: normal;"><br/></p><p style="margin-top: 0px; margin-bottom: 10px; white-space: normal; padding: 0px; list-style: none; border: 0px; overflow-wrap: break-word; word-break: break-all; line-height: 1.5em; font-family: "Helvetica Neue", Helvetica, "PingFang SC", "Hiragino Sans GB", "Microsoft YaHei", "Noto Sans CJK SC", "WenQuanYi Micro Hei", Arial, sans-serif; color: rgb(51, 51, 51); box-sizing: border-box;">当前系列所有demo下载地址:</p><p style="margin-top: 0px; margin-bottom: 10px; white-space: normal; padding: 0px; list-style: none; border: 0px; overflow-wrap: break-word; word-break: break-all; line-height: 1.5em; font-family: "Helvetica Neue", Helvetica, "PingFang SC", "Hiragino Sans GB", "Microsoft YaHei", "Noto Sans CJK SC", "WenQuanYi Micro Hei", Arial, sans-serif; color: rgb(51, 51, 51); box-sizing: border-box;"><a href="https://github.com/GaoRenBao/OpenCv4-Demo" target="_blank" style="margin: 0px; padding: 0px; list-style: none; border: 0px; color: rgb(0, 102, 0); transition-duration: 0.2s; transition-property: opacity; outline: none; opacity: 0.8;">https://github.com/GaoRenBao/OpenCv4-Demo</a></p><p style="margin-top: 0px; margin-bottom: 10px; text-wrap: wrap; padding: 0px; list-style: none; border: 0px; overflow-wrap: break-word; word-break: break-all; line-height: 1.5em; font-family: "Helvetica Neue", Helvetica, "PingFang SC", "Hiragino Sans GB", "Microsoft YaHei", "Noto Sans CJK SC", "WenQuanYi Micro Hei", Arial, sans-serif; box-sizing: border-box; color: rgb(51, 51, 51);">不同编程语言对应的OpenCv版本以及<span style="">开发环境</span>信息如下:<span style="font-family: Calibri; font-size: 14px;"> </span></p><table border="1" style="border-right: none; border-bottom: none; border-image: initial; border-left: 1px solid rgb(102, 102, 102); border-top: 1px solid rgb(102, 102, 102);"><tbody><tr class="firstRow"><td width="81" valign="top" style="border-color: windowtext rgb(102, 102, 102) rgb(102, 102, 102) windowtext; border-bottom-width: 1px; border-bottom-style: solid; border-right-width: 1px; border-right-style: solid; padding: 5px;"><p style="text-align: center;"><strong><span style="font-family: 宋体; font-size: 14px;">语言</span></strong></p></td><td width="223" valign="top" style="border-color: windowtext rgb(102, 102, 102) rgb(102, 102, 102) windowtext; border-bottom-width: 1px; border-bottom-style: solid; border-right-width: 1px; border-right-style: solid; padding: 5px;"><p style="text-align: center;"><strong><span style="font-family: 宋体; font-size: 14px;"><span style="font-family: Calibri;">OpenCv</span>版本</span></strong></p></td><td width="242" valign="top" style="border-color: windowtext rgb(102, 102, 102) rgb(102, 102, 102) windowtext; border-bottom-width: 1px; border-bottom-style: solid; border-right-width: 1px; border-right-style: solid; padding: 5px;"><p style="text-align: center;"><strong><span style="font-family: 宋体; font-size: 14px;"><span style="font-family: Calibri;">IDE</span></span></strong></p></td></tr><tr><td width="81" valign="top" style="border-top: none; border-left-color: windowtext; border-bottom: 1px solid rgb(102, 102, 102); border-right: 1px solid rgb(102, 102, 102); padding: 5px;"><p><span style="font-family: 宋体; font-size: 14px;"><span style="font-family: Calibri;">C#</span></span></p></td><td width="223" valign="top" style="border-top: none; border-left-color: windowtext; border-bottom: 1px solid rgb(102, 102, 102); border-right: 1px solid rgb(102, 102, 102); padding: 5px;"><p><span style="font-family: Calibri; letter-spacing: 0px;">OpenCvSharp4.4.8.0.20230708</span></p></td><td width="242" valign="top" style="border-top: none; border-left-color: windowtext; border-bottom: 1px solid rgb(102, 102, 102); border-right: 1px solid rgb(102, 102, 102); padding: 5px;"><p><span style="font-family: 宋体; font-size: 14px;"><span style="font-family: Calibri;">Visual Studio 2022</span></span></p></td></tr><tr><td width="81" valign="top" style="border-top: none; border-left-color: windowtext; border-bottom: 1px solid rgb(102, 102, 102); border-right: 1px solid rgb(102, 102, 102); padding: 5px;"><p><span style="font-family: 宋体; font-size: 14px;"><span style="font-family: Calibri;">C++</span></span></p></td><td width="223" valign="top" style="border-top: none; border-left-color: windowtext; border-bottom: 1px solid rgb(102, 102, 102); border-right: 1px solid rgb(102, 102, 102); padding: 5px;"><p><span style="font-family: 宋体; letter-spacing: 0px;"><span style="font-family: Calibri;">O</span></span><span style="font-family: Calibri; letter-spacing: 0px;">pen</span><span style="font-family: 宋体; letter-spacing: 0px;"><span style="font-family: Calibri;">C</span></span><span style="font-family: Calibri; letter-spacing: 0px;">v-4.5.5-vc14_vc15</span></p></td><td width="242" valign="top" style="border-top: none; border-left-color: windowtext; border-bottom: 1px solid rgb(102, 102, 102); border-right: 1px solid rgb(102, 102, 102); padding: 5px;"><p><span style="font-family: 宋体; font-size: 14px;"><span style="font-family: Calibri;">Visual Studio 2022</span></span></p></td></tr><tr><td width="81" valign="top" style="border-top: none; border-left-color: windowtext; border-bottom: 1px solid rgb(102, 102, 102); border-right: 1px solid rgb(102, 102, 102); padding: 5px;"><p><span style="font-family: 宋体; font-size: 14px;"><span style="font-family: Calibri;">Python</span></span></p></td><td width="223" valign="top" style="border-top: none; border-left-color: windowtext; border-bottom: 1px solid rgb(102, 102, 102); border-right: 1px solid rgb(102, 102, 102); padding: 5px;"><p><span style="font-family: 宋体; font-size: 14px;"><span style="font-family: Calibri;">OpenCv-Python (4.6.0.66)</span></span></p></td><td width="242" valign="top" style="border-top: none; border-left-color: windowtext; border-bottom: 1px solid rgb(102, 102, 102); border-right: 1px solid rgb(102, 102, 102); padding: 5px;"><p><span style="font-family: 宋体; font-size: 14px;"><span style="font-family: Calibri;">PyCharm Community Edition 2022.1.3</span></span></p></td></tr></tbody></table><p><br/></p><p>我们在上边做的直方图均衡化会改变整个图像的对比度,但是在很多情况下,这样做的效果并不好。例如,下图分别是输入图像和进行直方图均衡化之后的输出图像</p><p style="white-space: normal;">测试原图:</p><p style="white-space: normal;"><img src="/upload/image/6379857340711005795164043.png" title="tsukuba_l.png" alt="tsukuba_l.png"/></p><p style="white-space: normal;">运行效果图:</p><p style="white-space: normal;"><img src="/upload/image/6379857342859955894391764.jpg" title="clahe_2.jpg" alt="clahe_2.jpg"/></p><p style="white-space: normal;"> 的确在进行完直方图均衡化之后,图片背景的对比度被改变了。但是你再对比一下两幅图像中雕像的面图,由于太亮我们丢失了很多信息。造成这种结果的根本原因在于这幅图像的直方图并不是集中在某一个区域(试着画出它的直方图,你就明白了)</p><p style="white-space: normal;"> 为了解决这个问题,我们需要使用自适应的直方图均衡化。这种情况下,整幅图像会被分成很多小块,这些小块被称为“tiles”(在OpenCV中tiles的大小默认是8x8),然后再对每一个小块分别进行直方图均衡化(跟前面类似)。所以在每一个的区域中,直方图会集中在某一个小的区域中(除非有噪声干扰)。如果有噪声的话,噪声会被放大。为了避免这种情况的出现要使用对比度限制。对于每个小块来说,如果直方图中的bi超过对比度的上限的话,就把其中的像素点均匀分散到其他bins中,然后在进行直方图均衡化。最后,为了去除每一个小块之间“人造的”(由于算法造成)边界,再使用双线性差值,对小块进行缝合。</p><p style="white-space: normal;"> 下面的代码显示了如何使用OpenCV中的CLAHE</p><p style="white-space: normal;"><br/></p><p style="white-space: normal;"><strong style="margin: 0px; padding: 0px; list-style: none; border: 0px; color: rgb(51, 51, 51); font-family: "Helvetica Neue", Helvetica, "PingFang SC", "Hiragino Sans GB", "Microsoft YaHei", "Noto Sans CJK SC", "WenQuanYi Micro Hei", Arial, sans-serif; "><span style="font-size: 16px; font-style: italic; font-weight: bold; color: rgb(51, 153, 204); line-height: 18px;">C#版本运行代码如下:</span></strong></p><pre class="brush:c#;toolbar:false">using OpenCvSharp;
namespace demo
{
internal class Program
{
static void Main(string[] args)
{
Mat img = Cv2.ImRead("../../../images/tsukuba_l.png", 0);
//create a CLAHE object (Arguments are optional)
var clahe = Cv2.CreateCLAHE(2.0, new Size(8, 8));
Mat cl1 = new Mat();
clahe.Apply(img, cl1);
Cv2.ImShow("clahe_2", cl1);
Cv2.WaitKey(0);
}
}
}</pre><p style="white-space: normal;"><br/></p><p style="white-space: normal;"><strong style="margin: 0px; padding: 0px; list-style: none; border: 0px; color: rgb(51, 51, 51); font-family: "Helvetica Neue", Helvetica, "PingFang SC", "Hiragino Sans GB", "Microsoft YaHei", "Noto Sans CJK SC", "WenQuanYi Micro Hei", Arial, sans-serif; "><strong style="margin: 0px; padding: 0px; list-style: none; border: 0px;"><span style="font-size: 16px; font-style: italic; font-weight: bold; color: rgb(51, 153, 204); line-height: 18px;">C++<strong style="margin: 0px; padding: 0px; list-style: none; border: 0px;">版本运行代码如下:</strong></span><strong style="margin: 0px; padding: 0px; list-style: none; border: 0px;"></strong></strong></strong></p><p style="white-space: normal;"><strong style="margin: 0px; padding: 0px; list-style: none; border: 0px; color: rgb(51, 51, 51); font-family: "Helvetica Neue", Helvetica, "PingFang SC", "Hiragino Sans GB", "Microsoft YaHei", "Noto Sans CJK SC", "WenQuanYi Micro Hei", Arial, sans-serif; "><strong style="margin: 0px; padding: 0px; list-style: none; border: 0px;"><strong style="margin: 0px; padding: 0px; list-style: none; border: 0px;"></strong></strong></strong></p><pre class="brush:cpp;toolbar:false;">#include <opencv2/opencv.hpp>
#include <opencv2/cvconfig.h>
#include <opencv2/imgproc/imgproc.hpp>
#include <opencv2/highgui/highgui.hpp>
#include <io.h>
#include <string>
#include <iostream>
using namespace cv;
using namespace std;
int main()
{
Mat img = cv::imread("../images/tsukuba_l.png", 0);
//create a CLAHE object (Arguments are optional)
Ptr<CLAHE> clahe = cv::createCLAHE(2.0, Size(8, 8));
Mat cl1;
clahe->apply(img, cl1);
cv::imshow("clahe_2", cl1);
cv::waitKey(0);
}</pre><p style="white-space: normal;"><br/></p><p style="white-space: normal;"><strong style="margin: 0px; padding: 0px; list-style: none; border: 0px; color: rgb(51, 51, 51); font-family: "Helvetica Neue", Helvetica, "PingFang SC", "Hiragino Sans GB", "Microsoft YaHei", "Noto Sans CJK SC", "WenQuanYi Micro Hei", Arial, sans-serif; "><strong style="margin: 0px; padding: 0px; list-style: none; border: 0px;"><span style="font-size: 16px; font-style: italic; font-weight: bold; color: rgb(51, 153, 204); line-height: 18px;">Python<strong style="margin: 0px; padding: 0px; list-style: none; border: 0px;">版本运行代码如下:</strong></span><strong style="margin: 0px; padding: 0px; list-style: none; border: 0px;"></strong></strong></strong></p><pre class="brush:python;toolbar:false">import numpy as np
import cv2
img = cv2.imread('../images/tsukuba_l.png', 0)
# create a CLAHE object (Arguments are optional).
clahe = cv2.createCLAHE(clipLimit=2.0, tileGridSize=(8, 8))
cl1 = clahe.apply(img)
cv2.imwrite('clahe_2.jpg', cl1)</pre><p><br/></p>
CLAHE有限对比适应性直方图均衡化 本章节内容是博主网上收集的,PDF原文下载地址如下:
OpenCV-Python-Tutorial-中文版.pdf(P132 CLAHE有限对比适应性直方图均衡化)
在线预览
当前系列所有demo下载地址:
https://github.com/GaoRenBao/OpenCv4-Demo
不同编程语言对应的OpenCv版本以及开发环境 信息如下:
语言
OpenCv 版本
IDE
C#
OpenCvSharp4.4.8.0.20230708
Visual Studio 2022
C++
O pen C v-4.5.5-vc14_vc15
Visual Studio 2022
Python
OpenCv-Python (4.6.0.66)
PyCharm Community Edition 2022.1.3
我们在上边做的直方图均衡化会改变整个图像的对比度,但是在很多情况下,这样做的效果并不好。例如,下图分别是输入图像和进行直方图均衡化之后的输出图像
测试原图:
运行效果图:
的确在进行完直方图均衡化之后,图片背景的对比度被改变了。但是你再对比一下两幅图像中雕像的面图,由于太亮我们丢失了很多信息。造成这种结果的根本原因在于这幅图像的直方图并不是集中在某一个区域(试着画出它的直方图,你就明白了)
为了解决这个问题,我们需要使用自适应的直方图均衡化。这种情况下,整幅图像会被分成很多小块,这些小块被称为“tiles”(在OpenCV中tiles的大小默认是8x8),然后再对每一个小块分别进行直方图均衡化(跟前面类似)。所以在每一个的区域中,直方图会集中在某一个小的区域中(除非有噪声干扰)。如果有噪声的话,噪声会被放大。为了避免这种情况的出现要使用对比度限制。对于每个小块来说,如果直方图中的bi超过对比度的上限的话,就把其中的像素点均匀分散到其他bins中,然后在进行直方图均衡化。最后,为了去除每一个小块之间“人造的”(由于算法造成)边界,再使用双线性差值,对小块进行缝合。
下面的代码显示了如何使用OpenCV中的CLAHE
C#版本运行代码如下:
using OpenCvSharp;

namespace demo
{
    internal class Program
    {
        static void Main(string[] args)
        {
            Mat img = Cv2.ImRead("../../../images/tsukuba_l.png", 0);
            //create a CLAHE object (Arguments are optional)
            var clahe = Cv2.CreateCLAHE(2.0, new Size(8, 8));
            Mat cl1 = new Mat();
            clahe.Apply(img, cl1);
            Cv2.ImShow("clahe_2", cl1);
            Cv2.WaitKey(0);
        }
    }
}
C++版本运行代码如下:
#include <opencv2/opencv.hpp>
#include <opencv2/cvconfig.h>
#include <opencv2/imgproc/imgproc.hpp>
#include <opencv2/highgui/highgui.hpp>

#include <io.h>
#include <string>
#include <iostream>

using namespace cv;
using namespace std;

int main()
{
    Mat img = cv::imread("../images/tsukuba_l.png", 0);
    //create a CLAHE object (Arguments are optional)
    Ptr<CLAHE> clahe = cv::createCLAHE(2.0, Size(8, 8));
    Mat cl1;
    clahe->apply(img, cl1);

    cv::imshow("clahe_2", cl1);
    cv::waitKey(0);
}
Python版本运行代码如下:
import numpy as np
import cv2

img = cv2.imread('../images/tsukuba_l.png', 0)
# create a CLAHE object (Arguments are optional).
clahe = cv2.createCLAHE(clipLimit=2.0, tileGridSize=(8, 8))
cl1 = clahe.apply(img)
cv2.imwrite('clahe_2.jpg', cl1)


