查找并绘制轮廓综合示例
视频讲解如下:
当前系列所有demo下载地址:
https://github.com/GaoRenBao/OpenCv4-Demo
不同编程语言对应的OpenCv版本以及开发环境信息如下:
语言 | OpenCv版本 | IDE |
C# | OpenCvSharp4.4.8.0.20230708 | Visual Studio 2022 |
C++ | OpenCv-4.5.5-vc14_vc15 | Visual Studio 2022 |
Python | OpenCv-Python (4.6.0.66) | PyCharm Community Edition 2022.1.3 |
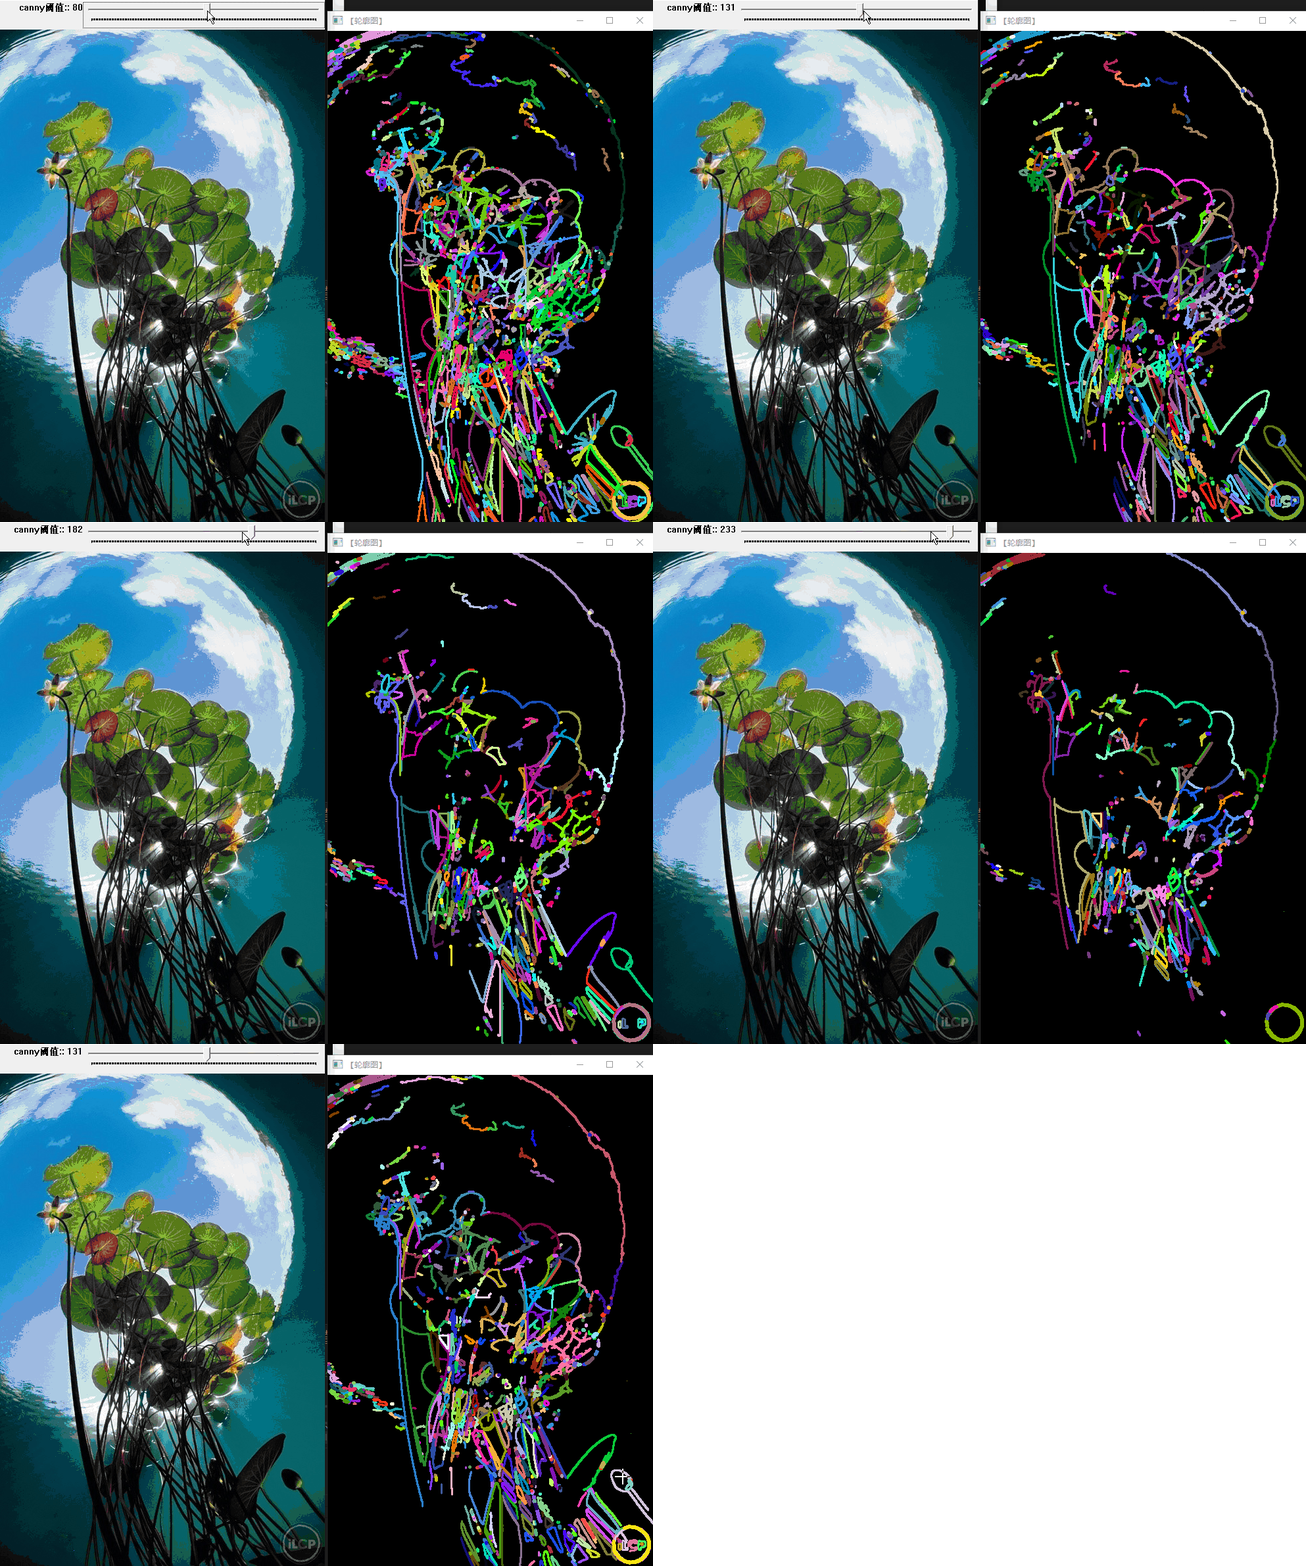
本章节是根据上一节内容进行整理的,代码集成了上一节的功能以及毛星云的轮廓查找功能。C#和Python也都是在C++版本的基础上转换过来的,三个版本的效果基本一致。
首先我们需要准备一张测试图片:

三组代码运行效果都是一样的,我这里就不一一展示了,最终运行效果如下,我这里拿C#版本的做个效果演示。

C#版本代码如下:
C#版本需要安装“OpenCvSharp4”、“OpenCvSharp4.runtime.win”两个库才行。不然会报错。
如果需要使用“ BitmapConverter.ToBitmap”操作,则需要追加安装“OpenCvSharp4.Extensions”库。
using OpenCvSharp;
using System;

namespace ConsoleApp
{
    internal class Program
    {
        static string WINDOW_NAME1 = "【原始图窗口】";//为窗口标题定义的宏
        static string WINDOW_NAME2 = "【轮廓图】";//为窗口标题定义的宏

        static Mat drawing = new Mat();
        static Mat g_srcImage = new Mat();
        static Mat g_grayImage = new Mat();
        static Mat g_cannyMat_output = new Mat();
        static int g_nThresh = 80;
        static int g_nThresh_max = 255;
        static Random g_rng = new Random();

        static void on_ThreshChange(int pos, IntPtr userData)
        {
#if true
            // 用Canny算子检测边缘
            Cv2.Canny(g_grayImage, g_cannyMat_output, g_nThresh, g_nThresh * 2, 3);

            // 寻找轮廓
            Point[][] g_vContours = new Point[][] { };
            HierarchyIndex[] g_vHierarchy;
            Cv2.FindContours(g_cannyMat_output, out g_vContours, out g_vHierarchy, RetrievalModes.Tree, ContourApproximationModes.ApproxSimple, null);

            // 绘出轮廓
            drawing = new Mat(g_srcImage.Size(), MatType.CV_8UC3);
            for (int i = 0; i < g_vContours.Length; i++)
            {
                //随机生成bgr值
                int b = g_rng.Next(255);//随机返回一个0~255之间的值
                int g = g_rng.Next(255);//随机返回一个0~255之间的值
                int r = g_rng.Next(255);//随机返回一个0~255之间的值
                Cv2.DrawContours(drawing, g_vContours, i, new Scalar(b, g, r), 2, LineTypes.Link8, g_vHierarchy);
            }
#else
            g_grayImage.CopyTo(g_cannyMat_output);
            Cv2.Threshold(g_cannyMat_output, g_cannyMat_output, g_nThresh, 255, ThresholdTypes.Binary);

            // 寻找轮廓
            drawing = new Mat(g_cannyMat_output.Size(), MatType.CV_8UC3);
            Point[][] contours = new Point[][] { };
            HierarchyIndex[] hierarcy;
            Cv2.FindContours(g_cannyMat_output, out contours, out hierarcy, RetrievalModes.CComp, ContourApproximationModes.ApproxSimple, null);

            // 绘出轮廓
            for (int index = 0; index < contours.Length; index++)
            {
                //随机生成bgr值
                int b = g_rng.Next(255);//随机返回一个0~255之间的值
                int g = g_rng.Next(255);//随机返回一个0~255之间的值
                int r = g_rng.Next(255);//随机返回一个0~255之间的值
                Cv2.DrawContours(drawing, contours, index, new Scalar(b, g, r), -1, LineTypes.Link8, hierarcy);
            }
#endif
            // 显示效果图
            Cv2.ImShow(WINDOW_NAME2, drawing);
        }

        static void Main(string[] args)
        {
            // 加载源图像
            g_srcImage = Cv2.ImRead("../../../images/flowers2.jpg");

            // 转成灰度
            Cv2.CvtColor(g_srcImage, g_grayImage, ColorConversionCodes.BGR2GRAY);

            // 创建窗口
            Cv2.NamedWindow(WINDOW_NAME1, WindowFlags.AutoSize);
            Cv2.ImShow(WINDOW_NAME1, g_srcImage);

            //创建滚动条并初始化
            Cv2.CreateTrackbar("canny阈值:", WINDOW_NAME1, ref g_nThresh, g_nThresh_max, on_ThreshChange);

            // 轮询等待用户按键,如果ESC键按下则退出程序
            while (true)
            {
                if ((char)Cv2.WaitKey(20) == 27)
                {
                    break;
                }
            }
        }
    }
}
C++版本代码如下:
#include "opencv2/highgui/highgui.hpp"
#include "opencv2/imgproc/imgproc.hpp"
#include <iostream>
using namespace cv;
using namespace std;

#define WINDOW_NAME1 "【原始图窗口】"          //为窗口标题定义的宏
#define WINDOW_NAME2 "【轮廓图】"                    //为窗口标题定义的宏

Mat g_srcImage;
Mat g_grayImage;
int g_nThresh = 80;
int g_nThresh_max = 255;
RNG g_rng(12345);
Mat g_cannyMat_output;
vector<vector<Point>> g_vContours;
vector<Vec4i> g_vHierarchy;

void on_ThreshChange(int, void*)
{
#if true
    // 用Canny算子检测边缘
    Canny(g_grayImage, g_cannyMat_output, g_nThresh, g_nThresh * 2, 3);

    // 寻找轮廓
    findContours(g_cannyMat_output, g_vContours, g_vHierarchy, RETR_TREE, CHAIN_APPROX_SIMPLE, Point(0, 0));

    // 绘出轮廓
    Mat drawing = Mat::zeros(g_cannyMat_output.size(), CV_8UC3);
    for (int i = 0; i < g_vContours.size(); i++)
    {
        Scalar color = Scalar(g_rng.uniform(0, 255), g_rng.uniform(0, 255), g_rng.uniform(0, 255));//任意值
        drawContours(drawing, g_vContours, i, color, 2, 8, g_vHierarchy, 0, Point());
    }
#else

    g_grayImage.copyTo(g_cannyMat_output);
    g_cannyMat_output = g_cannyMat_output > g_nThresh;

    // 寻找轮廓
    findContours(g_cannyMat_output, g_vContours, g_vHierarchy, RETR_CCOMP, CHAIN_APPROX_SIMPLE);

    // 绘出轮廓
    Mat drawing = Mat::zeros(g_cannyMat_output.size(), CV_8UC3);
    int index = 0;
    for (; index >= 0; index = g_vHierarchy[index][0])
    {
        Scalar color(rand() & 255, rand() & 255, rand() & 255);
        drawContours(drawing, g_vContours, index, color, FILLED, 8, g_vHierarchy);
    }
#endif

    // 显示效果图
    imshow(WINDOW_NAME2, drawing);
}

int main(int argc, char** argv)
{
    // 加载源图像
    g_srcImage = imread("../images/flowers2.jpg");
    if (!g_srcImage.data) { printf("读取图片错误,请确定目录下是否有imread函数指定的图片存在~! \n"); return false; }

    // 转成灰度并模糊化降噪
    cvtColor(g_srcImage, g_grayImage, COLOR_BGR2GRAY);
    //blur(g_grayImage, g_grayImage, Size(3, 3));

    // 创建窗口
    namedWindow(WINDOW_NAME1, WINDOW_AUTOSIZE);
    imshow(WINDOW_NAME1, g_srcImage);

    //创建滚动条并初始化
    createTrackbar("canny阈值", WINDOW_NAME1, &g_nThresh, g_nThresh_max, on_ThreshChange);
    on_ThreshChange(0, 0);

    waitKey(0);
    return(0);
}
Python版本代码如下:
import cv2
import numpy as np
import random

def zh_ch(string):
    return string.encode("gbk").decode(errors="ignore")

g_nThresh = 80

# 修改对比度
def on_ThreshChange(x):
    global g_nThresh, g_grayImage
    g_nThresh = cv2.getTrackbarPos('g_nThresh', 'dstImage')

    ################################################################

    # 用Canny算子检测边缘
    g_cannyMat_output = edge=cv2.Canny(g_grayImage,g_nThresh,g_nThresh * 2,3)
    # 查找轮廓
    contours, hierarchy  = cv2.findContours(g_cannyMat_output,cv2.RETR_TREE,cv2.CHAIN_APPROX_SIMPLE)
    imgH = g_grayImage.shape[0]
    imgW = g_grayImage.shape[1]
    dstImage = cv2.UMat((imgW, imgH), cv2.CV_8UC3)
    for i in range(0,len(contours)):
        cv2.drawContours(dstImage, contours, i, (random.randint(0,255), random.randint(0,255), random.randint(0,255)), 2, 8,  hierarchy)

    ################################################################

    #ret,g_cannyMat_output = cv2.threshold(g_grayImage,g_nThresh,255,cv2.THRESH_BINARY)
    ## 查找轮廓
    #contours, hierarchy  = cv2.findContours(g_cannyMat_output,cv2.RETR_CCOMP,cv2.CHAIN_APPROX_SIMPLE)
    #imgH = g_grayImage.shape[0]
    #imgW = g_grayImage.shape[1]
    #dstImage = cv2.UMat((imgW, imgH), cv2.CV_8UC3)
    #for i in range(0,len(contours)):
    #    cv2.drawContours(dstImage, contours, i, (random.randint(0,255), random.randint(0,255), random.randint(0,255)), -1, 8,  hierarchy)

    ################################################################

    cv2.imshow("dstImage", dstImage)
    cv2.waitKey(30)


# 【1】载入原始图
g_grayImage = cv2.imread("../images/flowers2.jpg")
cv2.imshow(zh_ch("原始图"), g_grayImage)

# 创建窗口
cv2.namedWindow('dstImage')
cv2.createTrackbar('g_nThresh', 'dstImage', 0, 255, on_ThreshChange)
cv2.setTrackbarPos('g_nThresh', 'dstImage', 80)

while (True):
    if cv2.waitKey(10) == ord('q'):
        break

cv2.destroyAllWindows()


