斑点检测
当前系列所有demo下载地址:
https://github.com/GaoRenBao/OpenCv4-Demo
参考资料:
https://www.learnopencv.com/blob-detection-using-opencv-python-c/
不同编程语言对应的OpenCv版本以及开发环境信息如下:
语言 | OpenCv版本 | IDE |
C# | OpenCvSharp4.4.8.0.20230708 | Visual Studio 2022 |
C++ | OpenCv-4.5.5-vc14_vc15 | Visual Studio 2022 |
Python | OpenCv-Python (4.6.0.66) | PyCharm Community Edition 2022.1.3 |
下面给大家演示如何使用SimpleBlobDetector进行斑点检测。
特别要注意,默认检测黑色点,如果要检测白色的点请设置bycolor为true,并且color数值是255.
斑点通常是指与周围有着颜色和灰度差别的区域。在实际地图中,往往存在着大量这样的斑点,如一颗树是一个斑点,一块草地是一个斑点,一栋房子也可以是一个斑点。
由于斑点代表的是一个区域,相比单纯的角点,它的稳定性要好,抗噪声能力要强,所以它在图像配准上扮演了很重要的角色。
同时有时图像中的斑点也是我们关心的区域,比如在医学与生物领域,我们需要从一些X光照片或细胞显微照片中提取一些具有特殊意义的斑点的位置或数量。
比如下图中天空的飞机、向日葵的花盘、X线断层图像中的两个斑点。
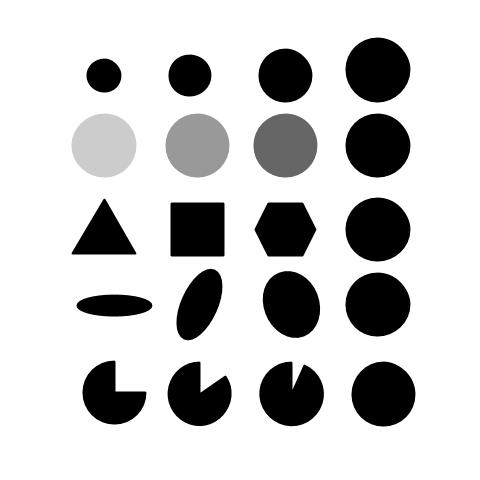
测试原图如下:

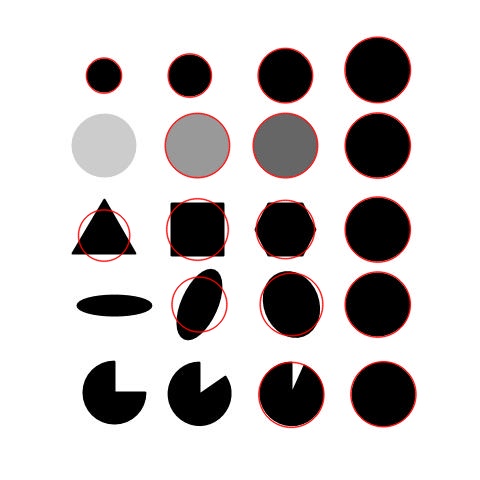
运行效果如下:

C#版本代码如下:
using OpenCvSharp;

namespace demo
{
    internal class Program
    {
        public static void Main(string[] args)
        {
            // Read image
            Mat im = Cv2.ImRead("../../../images/blob.jpg", ImreadModes.Grayscale);
            // 创建SimpleBlobDetector.Params对象并设置参数
            var detectorParams = new SimpleBlobDetector.Params
            {
                //MinDistBetweenBlobs = 10, // 10 pixels between blobs
                //MinRepeatability = 1,

                //MinThreshold = 100,
                //MaxThreshold = 255,
                //ThresholdStep = 5,

                FilterByColor = false,
                //BlobColor = 255 // to extract light blobs

                // 斑点面积
                FilterByArea = true,
                MinArea = 100, // 10 pixels squared
                MaxArea = 10000,

                // 斑点圆度
                FilterByCircularity = false,
                //MinCircularity = 0.001f,
                //MaxCircularity = 0.001f,

                //斑点凸度
                FilterByConvexity = false,
                //MinConvexity = 0.001f,
                //MaxConvexity = 10,

                //斑点惯性率
                FilterByInertia = false,
                //MinInertiaRatio = 0.001f,
                //MaxInertiaRatio  = 0.001f,
            };
            // Set up the detector with default parameters.
            SimpleBlobDetector detector = SimpleBlobDetector.Create(detectorParams);
            // Detect blobs.
            var keypoints = detector.Detect(im);

            // Draw detected blobs as red circles.
            // cv2.DRAW_MATCHES_FLAGS_DRAW_RICH_KEYPOINTS ensures the size of the circle corresponds to the size of blob
            var im_with_keypoints = new Mat();
            Cv2.DrawKeypoints(
                    image: im,
                    keypoints: keypoints,
                    outImage: im_with_keypoints,
                    color: Scalar.FromRgb(255, 0, 0),
                    flags: DrawMatchesFlags.DrawRichKeypoints);

            Cv2.ImShow("Keypoints.jpg", im_with_keypoints);
            Cv2.WaitKey(0);
        }
    }
}
C++版本代码如下:
#include <opencv2/opencv.hpp>
#include <iostream>

using namespace cv;
using namespace std;

int main()
{
    // Read image
    Mat im = cv::imread("../images/blob.jpg", IMREAD_GRAYSCALE);

    // 创建SimpleBlobDetector.Params对象并设置参数
    cv::SimpleBlobDetector::Params detectorParams;
    //detectorParams.thresholdStep = 5;
    //detectorParams.minThreshold = 100;
    //detectorParams.maxThreshold = 255;
    //detectorParams.minRepeatability = 1;
    //detectorParams.minDistBetweenBlobs = 10;
    detectorParams.filterByColor = false;
    //detectorParams.blobColor = 0;
    //斑点面积
    detectorParams.filterByArea = true;
    detectorParams.minArea = 100;
    detectorParams.maxArea = 100000;
    //斑点圆度
    detectorParams.filterByCircularity = false;
    //detectorParams.minCircularity = 0;
    //detectorParams.maxCircularity = (float)0;
    //斑点惯性率
    detectorParams.filterByInertia = false;
    //detectorParams.minInertiaRatio = 0;
    //detectorParams.maxInertiaRatio = (float)0;
    //斑点凸度
    detectorParams.filterByConvexity = false;
    //detectorParams.minConvexity = 0;
    //detectorParams.maxConvexity = (float)0;

    // Set up the detector with default parameters.
    cv::Ptr<cv::SimpleBlobDetector> detector = cv::SimpleBlobDetector::create(detectorParams);

    vector<cv::KeyPoint> key_points;
    detector->detect(im, key_points);
    cv::Mat im_with_keypoints;
    //绘制结果
    cv::drawKeypoints(im, key_points, im_with_keypoints, cv::Scalar(0, 0, 255), DrawMatchesFlags::DRAW_RICH_KEYPOINTS);

    cv::imshow("Keypoints", im_with_keypoints);
    cv::waitKey(0);
}
Python版本代码如下:
import cv2
import numpy as np

# Read image
im = cv2.imread("../images/blob.jpg", cv2.IMREAD_GRAYSCALE)

# Setup SimpleBlobDetector parameters.
params = cv2.SimpleBlobDetector_Params()
params.filterByColor = False

# Change thresholds
#params.minThreshold = 10
#params.maxThreshold = 200

# 斑点面积
params.filterByArea = True
params.minArea = 100
params.maxArea = 100000

# 斑点圆度
params.filterByCircularity = False
#params.minCircularity = 0.1
#params.maxCircularity = 0.1

# 斑点凸度
params.filterByConvexity = False
#params.minConvexity = 0.87
#params.maxConvexity = 0.87

# 斑点惯性率
params.filterByInertia = False
#params.minInertiaRatio = 0.01
#params.maxInertiaRatio = 0.01

# Create a detector with the parameters
ver = (cv2.__version__).split('.')
if int(ver[0]) < 3:
    detector = cv2.SimpleBlobDetector(params)
else:
    detector = cv2.SimpleBlobDetector_create(params)

# Detect blobs.
keypoints = detector.detect(im)
# Draw detected blobs as red circles.
# cv2.DRAW_MATCHES_FLAGS_DRAW_RICH_KEYPOINTS ensures the size of the circle corresponds to the size of blob
im_with_keypoints = cv2.drawKeypoints(im, keypoints, np.array([]), (0, 0, 255), cv2.DRAW_MATCHES_FLAGS_DRAW_RICH_KEYPOINTS)
# Show keypoints
cv2.imshow("Keypoints.jpg", im_with_keypoints)
cv2.imwrite("Keypoints.jpg", im_with_keypoints)
cv2.waitKey(0)


