<h1 style="font-size: 32px; font-weight: bold; border-bottom: 2px solid rgb(204, 204, 204); padding: 0px 4px 0px 0px; text-align: left; margin: 0px 0px 10px;">XML和YAML文件的写入</h1><p>视频讲解如下:</p><p><embed src="//player.bilibili.com/player.html?aid=806522199&bvid=BV1V34y1Z7SM&cid=438404885&page=1&high_quality=1&danmaku=0" width="817" height="460" wmode="transparent" play="true" loop="false" menu="false" allowscriptaccess="never" allowfullscreen="true"/><br/></p><p><br/></p><p style="margin-top: 0px; margin-bottom: 10px; white-space: normal; padding: 0px; list-style: none; border: 0px; overflow-wrap: break-word; word-break: break-all; line-height: 1.5em; font-family: "Helvetica Neue", Helvetica, "PingFang SC", "Hiragino Sans GB", "Microsoft YaHei", "Noto Sans CJK SC", "WenQuanYi Micro Hei", Arial, sans-serif; color: rgb(51, 51, 51); box-sizing: border-box;">当前系列所有demo下载地址:</p><p style="margin-top: 0px; margin-bottom: 10px; white-space: normal; padding: 0px; list-style: none; border: 0px; overflow-wrap: break-word; word-break: break-all; line-height: 1.5em; font-family: "Helvetica Neue", Helvetica, "PingFang SC", "Hiragino Sans GB", "Microsoft YaHei", "Noto Sans CJK SC", "WenQuanYi Micro Hei", Arial, sans-serif; color: rgb(51, 51, 51); box-sizing: border-box;"><a href="https://github.com/GaoRenBao/OpenCv4-Demo" target="_blank" style="margin: 0px; padding: 0px; list-style: none; border: 0px; color: rgb(0, 102, 0); transition-duration: 0.2s; transition-property: opacity; outline: none; opacity: 0.8;">https://github.com/GaoRenBao/OpenCv4-Demo</a></p><p style="margin-top: 0px; margin-bottom: 10px; text-wrap: wrap; padding: 0px; list-style: none; border: 0px; overflow-wrap: break-word; word-break: break-all; line-height: 1.5em; font-family: "Helvetica Neue", Helvetica, "PingFang SC", "Hiragino Sans GB", "Microsoft YaHei", "Noto Sans CJK SC", "WenQuanYi Micro Hei", Arial, sans-serif; box-sizing: border-box; color: rgb(51, 51, 51);">不同编程语言对应的OpenCv版本以及<span style="">开发环境</span>信息如下:<span style="font-family: Calibri; font-size: 14px;"> </span></p><table border="1" style="text-wrap: wrap; border-right: none; border-bottom: none; border-image: initial; border-left: 1px solid rgb(102, 102, 102); border-top: 1px solid rgb(102, 102, 102);"><tbody><tr class="firstRow"><td width="81" valign="top" style="border-color: windowtext rgb(102, 102, 102) rgb(102, 102, 102) windowtext; border-bottom-width: 1px; border-bottom-style: solid; border-right-width: 1px; border-right-style: solid; padding: 5px;"><p style="text-align: center;"><strong><span style="font-family: 宋体; font-size: 14px;">语言</span></strong></p></td><td width="223" valign="top" style="border-color: windowtext rgb(102, 102, 102) rgb(102, 102, 102) windowtext; border-bottom-width: 1px; border-bottom-style: solid; border-right-width: 1px; border-right-style: solid; padding: 5px;"><p style="text-align: center;"><strong><span style="font-family: 宋体; font-size: 14px;"><span style="font-family: Calibri;">OpenCv</span>版本</span></strong></p></td><td width="242" valign="top" style="border-color: windowtext rgb(102, 102, 102) rgb(102, 102, 102) windowtext; border-bottom-width: 1px; border-bottom-style: solid; border-right-width: 1px; border-right-style: solid; padding: 5px;"><p style="text-align: center;"><strong><span style="font-family: 宋体; font-size: 14px;"><span style="font-family: Calibri;">IDE</span></span></strong></p></td></tr><tr><td width="81" valign="top" style="border-top: none; border-left-color: windowtext; border-bottom: 1px solid rgb(102, 102, 102); border-right: 1px solid rgb(102, 102, 102); padding: 5px;"><p><span style="font-family: 宋体; font-size: 14px;"><span style="font-family: Calibri;">C#</span></span></p></td><td width="223" valign="top" style="border-top: none; border-left-color: windowtext; border-bottom: 1px solid rgb(102, 102, 102); border-right: 1px solid rgb(102, 102, 102); padding: 5px;"><p><span style="font-family: Calibri; letter-spacing: 0px;">OpenCvSharp4.4.8.0.20230708</span></p></td><td width="242" valign="top" style="border-top: none; border-left-color: windowtext; border-bottom: 1px solid rgb(102, 102, 102); border-right: 1px solid rgb(102, 102, 102); padding: 5px;"><p><span style="font-family: 宋体; font-size: 14px;"><span style="font-family: Calibri;">Visual Studio 2022</span></span></p></td></tr><tr><td width="81" valign="top" style="border-top: none; border-left-color: windowtext; border-bottom: 1px solid rgb(102, 102, 102); border-right: 1px solid rgb(102, 102, 102); padding: 5px;"><p><span style="font-family: 宋体; font-size: 14px;"><span style="font-family: Calibri;">C++</span></span></p></td><td width="223" valign="top" style="border-top: none; border-left-color: windowtext; border-bottom: 1px solid rgb(102, 102, 102); border-right: 1px solid rgb(102, 102, 102); padding: 5px;"><p><span style="font-family: 宋体; letter-spacing: 0px;"><span style="font-family: Calibri;">O</span></span><span style="font-family: Calibri; letter-spacing: 0px;">pen</span><span style="font-family: 宋体; letter-spacing: 0px;"><span style="font-family: Calibri;">C</span></span><span style="font-family: Calibri; letter-spacing: 0px;">v-4.5.5-vc14_vc15</span></p></td><td width="242" valign="top" style="border-top: none; border-left-color: windowtext; border-bottom: 1px solid rgb(102, 102, 102); border-right: 1px solid rgb(102, 102, 102); padding: 5px;"><p><span style="font-family: 宋体; font-size: 14px;"><span style="font-family: Calibri;">Visual Studio 2022</span></span></p></td></tr><tr><td width="81" valign="top" style="border-top: none; border-left-color: windowtext; border-bottom: 1px solid rgb(102, 102, 102); border-right: 1px solid rgb(102, 102, 102); padding: 5px;"><p><span style="font-family: 宋体; font-size: 14px;"><span style="font-family: Calibri;">Python</span></span></p></td><td width="223" valign="top" style="border-top: none; border-left-color: windowtext; border-bottom: 1px solid rgb(102, 102, 102); border-right: 1px solid rgb(102, 102, 102); padding: 5px;"><p><span style="font-family: 宋体; font-size: 14px;"><span style="font-family: Calibri;">OpenCv-Python (4.6.0.66)</span></span></p></td><td width="242" valign="top" style="border-top: none; border-left-color: windowtext; border-bottom: 1px solid rgb(102, 102, 102); border-right: 1px solid rgb(102, 102, 102); padding: 5px;"><p><span style="font-family: 宋体; font-size: 14px;"><span style="font-family: Calibri;">PyCharm Community Edition 2022.1.3</span></span></p><p><span style="font-family: 宋体; font-size: 14px;"><span style="font-family: Calibri;"><br/></span></span></p></td></tr></tbody></table><p style="margin-top: 0px; margin-bottom: 10px; white-space: normal; box-sizing: border-box; overflow-wrap: break-word; word-break: break-all; line-height: 1.5em; font-family: "Helvetica Neue", Helvetica, "PingFang SC", "Hiragino Sans GB", "Microsoft YaHei", "Noto Sans CJK SC", "WenQuanYi Micro Hei", Arial, sans-serif; color: rgb(51, 51, 51); "><a target="_blank" href="https://pan.baidu.com/s/1T9xl4KOBvU1g7AyDfPWlpw" style="box-sizing: border-box; color: rgb(0, 102, 0); transition-duration: 0.2s; transition-property: opacity; background-color: transparent; outline: none;"></a></p><p style="white-space: normal;"><br/></p><p>XML和YAMl文件操作方式好像基本都一样,所以,下面演示就不做区分了。</p><p><br/></p><h1 style="font-size: 16px;font-weight:bold"><span style="font-size: 16px; font-style: italic; font-weight: bold; color: rgb(51, 153, 204); line-height: 18px;">C#版本</span></h1><p style="white-space: normal;">C#版本需要安装“OpenCvSharp4”、“OpenCvSharp4.runtime.win”两个库才行。不然会报错。</p><p style="white-space: normal;">如果需要使用“ BitmapConverter.ToBitmap”操作,则需要追加安装“OpenCvSharp4.Extensions”库。</p><p>C#版本可以参考官方代码:OpenCvSharp.Tests\core\FileStorageTest.cs<br/></p><p>写入效果如下:</p><p><img class="pimg" src="/upload/image/QQ截图20211107094903.jpg"/></p><p>演示代码如下:</p><pre style="overflow-x:auto;font-size: 15px;" class="brush:c#;toolbar:false;">using OpenCvSharp;
using System;
namespace demo
{
internal class Program
{
static void Main(string[] args)
{
//开始文件写入
// opencv3:FileStorage.Mode.Write
// opencv4:FileStorage.Modes.Write
using (var fs = new FileStorage("test.yaml", FileStorage.Modes.Write))
{
fs.Add("frameCount").Add(5);
fs.Add("calibrationDate").Add(DateTime.Now.ToString());
Array data1 = new double[] { 1000, 0, 320, 0, 1000, 240, 0, 0, 1 };
Mat cameraMatrix = new Mat(3, 3, MatType.CV_64FC1, data1);
fs.Add("cameraMatrix").Add(cameraMatrix);
Array data2 = new double[] { 0.1, 0.01, -0.001, 0, 0 };
Mat distCoeffs = new Mat(5, 1, MatType.CV_64FC1, data2);
fs.Add("distCoeffs").Add(distCoeffs);
Random g_rng = new Random();
fs.Add("features").Add("[");
for (int i = 0; i < 3; i++)
{
int x = g_rng.Next(255) % 640;
int y = g_rng.Next(255) % 480;
byte lbp = (byte)(g_rng.Next(255) % 256);
fs.Add("{:")
.Add("x").Add(x)
.Add("y").Add(y)
.Add("lbp").Add("[:");
for (int j = 0; j < 8; j++)
fs.Add((lbp >> j) & 1);
fs.Add("]")
.Add("}");
}
fs.Add("]");
}
}
}
}</pre><p><br/></p><h1 style="font-size: 16px;font-weight:bold"><span style="font-size: 16px; font-style: italic; font-weight: bold; color: rgb(51, 153, 204); line-height: 18px;">C++版本</span></h1><p>C++版本采用的是毛星的代码,如果直接编译运行,会报如下错误:</p><p>'asctime': This function or variable may be unsafe. Consider using asctime_s instead. To disable deprecation, use_CRT_SECURE_NO_WARNINGS. See online help for details.</p><p><img class="pimg" src="/upload/image/QQ截图20211016143733.jpg"/></p><p><br/></p><p>解决方案是:</p><p>右击工程-->属性-->配置属性 --> C/C++ --> 命令行-->输入"/D _CRT_SECURE_NO_WARNINGS"-->"确定",这样问题就可以解决了。如下图所示:</p><p><img class="pimg" src="/upload/image/XML和YAMl文件的写入配置.gif"/></p><p><br/></p><p>生成的test.yaml文件内容如下:</p><p><img class="pimg" src="/upload/image/QQ截图20211016143531.jpg"/></p><p>演示代码如下</p><pre style="overflow-x:auto;font-size: 15px;" class="brush:cpp;toolbar:false;">#include <opencv2/opencv.hpp>
#include <time.h>
using namespace cv;
int main()
{
//改变console字体颜色
system("color 5F");
//初始化
FileStorage fs("test.yaml", FileStorage::WRITE);
//开始文件写入
fs << "frameCount" << 5;
time_t rawtime;
time(&rawtime);
fs << "calibrationDate" << asctime(localtime(&rawtime));
Mat cameraMatrix = (Mat_<double>(3, 3) << 1000, 0, 320, 0, 1000, 240, 0, 0, 1);
Mat distCoeffs = (Mat_<double>(5, 1) << 0.1, 0.01, -0.001, 0, 0);
fs << "cameraMatrix" << cameraMatrix << "distCoeffs" << distCoeffs;
fs << "features" << "[";
for (int i = 0; i < 3; i++)
{
int x = rand() % 640;
int y = rand() % 480;
uchar lbp = rand() % 256;
fs << "{:" << "x" << x << "y" << y << "lbp" << "[:";
for (int j = 0; j < 8; j++)
fs << ((lbp >> j) & 1);
fs << "]" << "}";
}
fs << "]";
fs.release();
printf("\n文件读写完毕,请在工程目录下查看生成的文件~");
getchar();
return 0;
}</pre><p><br/></p><h1 style="font-size: 16px;font-weight:bold"><span style="font-size: 16px; font-style: italic; font-weight: bold; color: rgb(51, 153, 204); line-height: 18px;">Python版本</span></h1><p>Python版本和前面两个版本差异比较大,采用的是pyyaml库,而不是FileStorage,FileStorage在Python里面没找到相关资料,只找到pyyaml,Python如何生成和前面两个版本的yaml,暂时没搞明白,但是基本上都是能操作yaml文件的。</p><p><br/></p><p>pyyaml库的可以通过执行以下命令来安装</p><pre class="brush:bash;toolbar:false">pip install pyyaml -i https://mirror.baidu.com/pypi/simple</pre><p>写入效果如下:</p><p><img class="pimg" src="/upload/image/QQ截图20211107095614.jpg"/></p><p>演示代码如下:</p><pre style="overflow-x:auto;font-size: 15px;" class="brush:python;toolbar:false;"># pip install pyyaml -i https://mirror.baidu.com/pypi/simple
import numpy as np
import yaml
import time
import random
def setMat(mat):
imgH = mat.shape[0]
imgW = mat.shape[1]
for w in range(imgW):
for h in range(imgH):
b = 0xff
g = (imgH - h) / imgH * 0xff
r = (imgW - w) / imgW * 0xff
a = 0.5 * (g + r)
mat[h, w] = [b, g, r, a]
cameraMatrix = np.ones((3, 3, 4), np.uint8) * 255
setMat(cameraMatrix)
with open("test.yaml", "w", encoding="utf-8") as f:
x = random.randint(0, 255) % 640
y = random.randint(0, 255) % 480
lbp = random.randint(0, 255) % 256
aproject = {'frameCount': 5,
'calibrationDate': time.time(),
'cameraMatrix': cameraMatrix,
'features': {'x': x, 'y': y, 'lbp': lbp}
}
yaml.dump(aproject, f)</pre><p><br/></p>
XML和YAML文件的写入 视频讲解如下:
当前系列所有demo下载地址:
https://github.com/GaoRenBao/OpenCv4-Demo
不同编程语言对应的OpenCv版本以及开发环境 信息如下:
语言
OpenCv 版本
IDE
C#
OpenCvSharp4.4.8.0.20230708
Visual Studio 2022
C++
O pen C v-4.5.5-vc14_vc15
Visual Studio 2022
Python
OpenCv-Python (4.6.0.66)
PyCharm Community Edition 2022.1.3
XML和YAMl文件操作方式好像基本都一样,所以,下面演示就不做区分了。
C#版本 C#版本需要安装“OpenCvSharp4”、“OpenCvSharp4.runtime.win”两个库才行。不然会报错。
如果需要使用“ BitmapConverter.ToBitmap”操作,则需要追加安装“OpenCvSharp4.Extensions”库。
C#版本可以参考官方代码:OpenCvSharp.Tests\core\FileStorageTest.cs
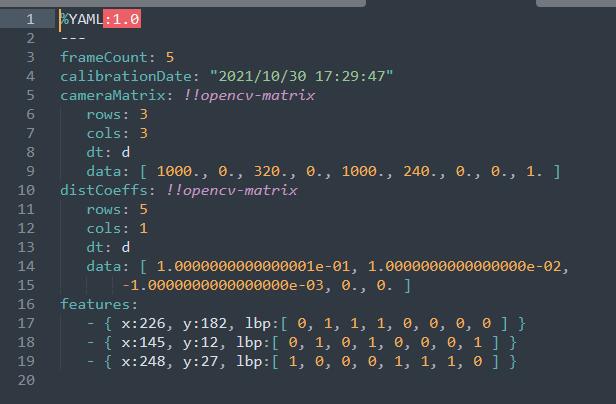
写入效果如下:
演示代码如下:
using OpenCvSharp;
using System;

namespace demo
{
    internal class Program
    {
        static void Main(string[] args)
        {
            //开始文件写入
            // opencv3:FileStorage.Mode.Write
            // opencv4:FileStorage.Modes.Write
            using (var fs = new FileStorage("test.yaml", FileStorage.Modes.Write))
            {
                fs.Add("frameCount").Add(5);
                fs.Add("calibrationDate").Add(DateTime.Now.ToString());

                Array data1 = new double[] { 1000, 0, 320, 0, 1000, 240, 0, 0, 1 };
                Mat cameraMatrix = new Mat(3, 3, MatType.CV_64FC1, data1);
                fs.Add("cameraMatrix").Add(cameraMatrix);

                Array data2 = new double[] { 0.1, 0.01, -0.001, 0, 0 };
                Mat distCoeffs = new Mat(5, 1, MatType.CV_64FC1, data2);
                fs.Add("distCoeffs").Add(distCoeffs);

                Random g_rng = new Random();
                fs.Add("features").Add("[");
                for (int i = 0; i < 3; i++)
                {
                    int x = g_rng.Next(255) % 640;
                    int y = g_rng.Next(255) % 480;
                    byte lbp = (byte)(g_rng.Next(255) % 256);
                    fs.Add("{:")
                    .Add("x").Add(x)
                    .Add("y").Add(y)
                    .Add("lbp").Add("[:");
                    for (int j = 0; j < 8; j++)
                        fs.Add((lbp >> j) & 1);
                    fs.Add("]")
                    .Add("}");
                }
                fs.Add("]");
            }
        }
    }
}
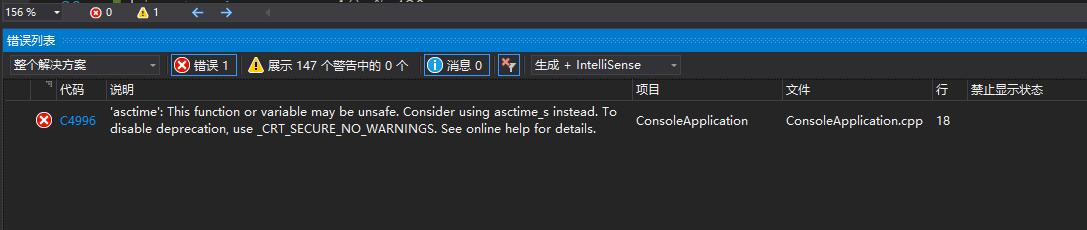
C++版本 C++版本采用的是毛星的代码,如果直接编译运行,会报如下错误:
'asctime': This function or variable may be unsafe. Consider using asctime_s instead. To disable deprecation, use_CRT_SECURE_NO_WARNINGS. See online help for details.
解决方案是:
右击工程-->属性-->配置属性 --> C/C++ --> 命令行-->输入"/D _CRT_SECURE_NO_WARNINGS"-->"确定",这样问题就可以解决了。如下图所示:
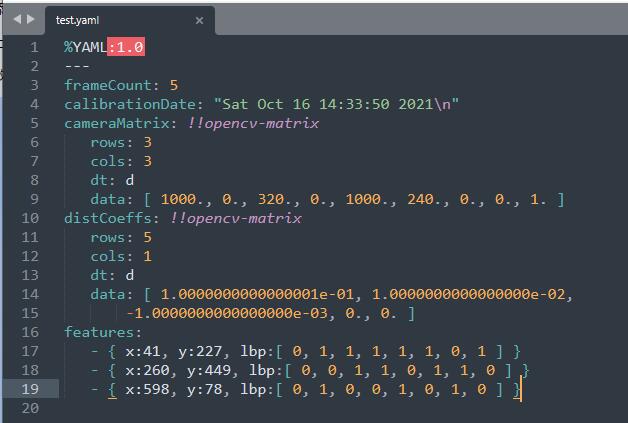
生成的test.yaml文件内容如下:
演示代码如下
#include <opencv2/opencv.hpp>
#include <time.h>

using namespace cv;

int main()
{
    //改变console字体颜色
    system("color 5F");

    //初始化
    FileStorage fs("test.yaml", FileStorage::WRITE);

    //开始文件写入
    fs << "frameCount" << 5;
    time_t rawtime;
    time(&rawtime);
    fs << "calibrationDate" << asctime(localtime(&rawtime));
    Mat cameraMatrix = (Mat_<double>(3, 3) << 1000, 0, 320, 0, 1000, 240, 0, 0, 1);
    Mat distCoeffs = (Mat_<double>(5, 1) << 0.1, 0.01, -0.001, 0, 0);
    fs << "cameraMatrix" << cameraMatrix << "distCoeffs" << distCoeffs;
    fs << "features" << "[";
    for (int i = 0; i < 3; i++)
    {
        int x = rand() % 640;
        int y = rand() % 480;
        uchar lbp = rand() % 256;

        fs << "{:" << "x" << x << "y" << y << "lbp" << "[:";
        for (int j = 0; j < 8; j++)
            fs << ((lbp >> j) & 1);
        fs << "]" << "}";
    }
    fs << "]";
    fs.release();

    printf("\n文件读写完毕,请在工程目录下查看生成的文件~");
    getchar();

    return 0;
}
Python版本 Python版本和前面两个版本差异比较大,采用的是pyyaml库,而不是FileStorage,FileStorage在Python里面没找到相关资料,只找到pyyaml,Python如何生成和前面两个版本的yaml,暂时没搞明白,但是基本上都是能操作yaml文件的。
pyyaml库的可以通过执行以下命令来安装
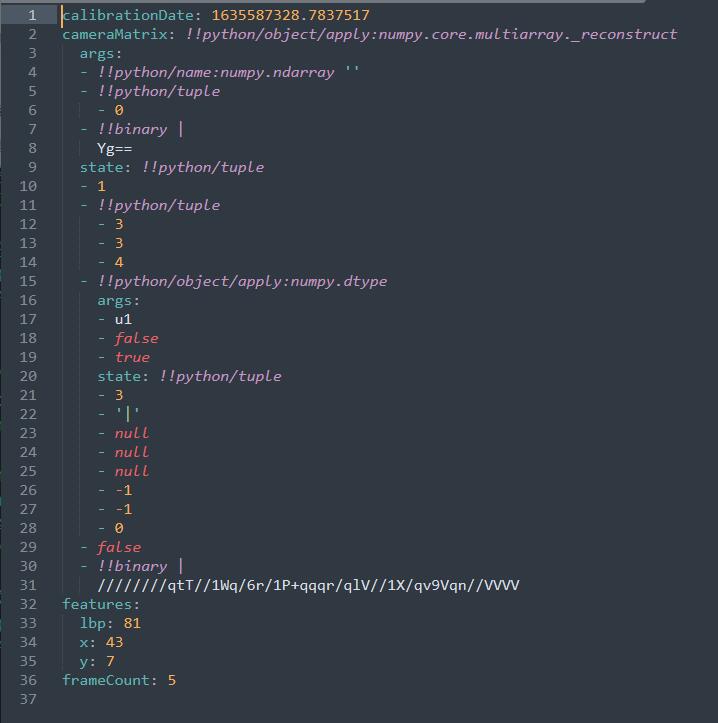
pip install pyyaml -i https://mirror.baidu.com/pypi/simple 写入效果如下:
演示代码如下:
# pip install pyyaml -i https://mirror.baidu.com/pypi/simple

import numpy as np
import yaml
import time
import random

def setMat(mat):
    imgH = mat.shape[0]
    imgW = mat.shape[1]
    for w in range(imgW):
        for h in range(imgH):
            b = 0xff
            g = (imgH - h) / imgH * 0xff
            r = (imgW - w) / imgW * 0xff
            a = 0.5 * (g + r)
            mat[h, w] = [b, g, r, a]


cameraMatrix = np.ones((3, 3, 4), np.uint8) * 255
setMat(cameraMatrix)

with open("test.yaml", "w", encoding="utf-8") as f:
    x = random.randint(0, 255) % 640
    y = random.randint(0, 255) % 480
    lbp = random.randint(0, 255) % 256

    aproject = {'frameCount': 5,
                'calibrationDate': time.time(),
                'cameraMatrix': cameraMatrix,
                'features': {'x': x, 'y': y, 'lbp': lbp}
                }
    yaml.dump(aproject, f)