XML和YAML文件的读取
视频讲解如下:
当前系列所有demo下载地址:
https://github.com/GaoRenBao/OpenCv4-Demo
不同编程语言对应的OpenCv版本以及开发环境信息如下:
语言 | OpenCv版本 | IDE |
C# | OpenCvSharp4.4.8.0.20230708 | Visual Studio 2022 |
C++ | OpenCv-4.5.5-vc14_vc15 | Visual Studio 2022 |
Python | OpenCv-Python (4.6.0.66) | PyCharm Community Edition 2022.1.3 |
XML和YAMl文件操作方式好像基本都一样,所以,下面演示就不做区分了,读取的内容为上一章节写入的yaml文件
C#版本
C#版本需要安装“OpenCvSharp4”、“OpenCvSharp4.runtime.win”两个库才行。不然会报错。
如果需要使用“ BitmapConverter.ToBitmap”操作,则需要追加安装“OpenCvSharp4.Extensions”库。
C#版本可以参考官方代码:OpenCvSharp.Tests\core\FileStorageTest.cs
读取效果如下:

演示代码如下:
using OpenCvSharp;
using System;

namespace demo
{
    internal class Program
    {
        private static void log(string a)
        {
            Console.WriteLine(a);
        }
        private static void log2(string a)
        {
            Console.Write(a);
        }

        static void Main(string[] args)
        {
            // opencv3:FileStorage.Mode.Read
            // opencv4:FileStorage.Modes.Read
            using (var fs = new FileStorage("test.yaml", FileStorage.Modes.Read))
            {
                if (fs.IsOpened() == false)
                {
                    Console.WriteLine("文件打开失败.");
                    Console.Read();
                    return;
                }

                using (var node = fs["frameCount"])
                {
                    log($"{node.Name},{node.Type},{node.ReadInt()}\r\n");
                }

                using (var node = fs["calibrationDate"])
                {
                    log($"{node.Name},{node.Type},{node.ReadString()}\r\n");
                }

                using (var node = fs["cameraMatrix"])
                {
                    log($"{node.Name}");
                    foreach (var a in node)
                    {
                        if (a.Type == FileNode.Types.Seq)
                        {
                            log2($"\t{a.Name}:[");
                            foreach (var b in a) { log2($"{b.ReadInt()},"); }
                            log($"]");
                        }
                        else
                        {
                            string str = ((a.Type == FileNode.Types.String) ? a.ReadString() : a.ReadInt().ToString());
                            log($"\t{a.Name},{a.Type},{str}");
                        }
                    }
                }

                using (var node = fs["distCoeffs"])
                {
                    log($"{node.Name}");
                    foreach (var a in node)
                    {
                        if (a.Type == FileNode.Types.Seq)
                        {
                            log2($"\t{a.Name}:[");
                            foreach (var b in a) { log2($"{b.ReadDouble()},"); }
                            log($"]");
                        }
                        else
                        {
                            string str = ((a.Type == FileNode.Types.String) ? a.ReadString() : a.ReadInt().ToString());
                            log($"\t{a.Name},{a.Type},{str}");
                        }
                    }
                }

                using (var node = fs["features"])
                {
                    log($"{node.Name}");
                    foreach (var a in node)
                    {
                        if (a.Type == FileNode.Types.Map)
                        {
                            foreach (var b in a)
                            {
                                if (b.Type == FileNode.Types.Seq)
                                {
                                    log2($"\t{b.Name}:[");
                                    foreach (var c in b) { log2($"{c.ReadDouble()},"); }
                                    log($"]");
                                }
                                else
                                {
                                    string str = ((b.Type == FileNode.Types.String) ? b.ReadString() : b.ReadInt().ToString());
                                    log($"\t{b.Name},{b.Type},{str}");
                                }
                            }
                        }
                        else
                        {
                            string str = ((a.Type == FileNode.Types.String) ? a.ReadString() : a.ReadInt().ToString());
                            log($"\t{a.Name},{a.Type},{str}");
                        }
                    }
                }
            }

            Console.Read();
        }
    }
}
C++版本
C++版本采用的是毛星的代码,运行读取结果如下:
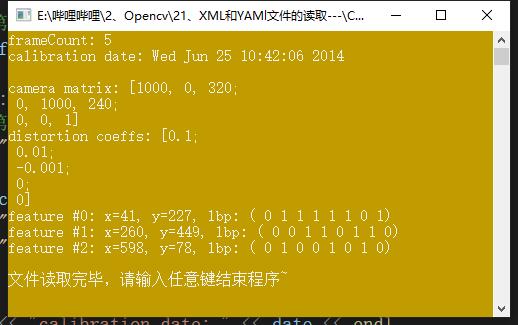
演示代码如下
#include "opencv2/opencv.hpp"
#include <time.h>
using namespace cv;
using namespace std;

int main()
{
    //改变console字体颜色
    system("color 6F");

    //初始化
    FileStorage fs2("test.yaml", FileStorage::READ);

    // 第一种方法,对FileNode操作
    int frameCount = (int)fs2["frameCount"];

    std::string date;
    // 第二种方法,使用FileNode运算符> >
    fs2["calibrationDate"] >> date;

    Mat cameraMatrix2, distCoeffs2;
    fs2["cameraMatrix"] >> cameraMatrix2;
    fs2["distCoeffs"] >> distCoeffs2;

    cout << "frameCount: " << frameCount << endl
        << "calibration date: " << date << endl
        << "camera matrix: " << cameraMatrix2 << endl
        << "distortion coeffs: " << distCoeffs2 << endl;

    FileNode features = fs2["features"];
    FileNodeIterator it = features.begin(), it_end = features.end();
    int idx = 0;
    std::vector<uchar> lbpval;

    //使用FileNodeIterator遍历序列
    for (; it != it_end; ++it, idx++)
    {
        cout << "feature #" << idx << ": ";
        cout << "x=" << (int)(*it)["x"] << ", y=" << (int)(*it)["y"] << ", lbp: (";
        // 我们也可以使用使用filenode > > std::vector操作符很容易的读数值阵列
        (*it)["lbp"] >> lbpval;
        for (int i = 0; i < (int)lbpval.size(); i++)
            cout << " " << (int)lbpval[i];
        cout << ")" << endl;
    }
    fs2.release();

    //程序结束,输出一些帮助文字
    printf("\n文件读取完毕,请输入任意键结束程序~");
    getchar();

    return 0;
}
Python版本
Python版本和前面两个版本差异比较大,采用的是pyyaml库,而不是FileStorage,FileStorage在Python里面没找到相关资料,只找到pyyaml,Python如何生成和前面两个版本的yaml,暂时没搞明白,但是基本上都是能操作yaml文件的。
pyyaml库的可以通过执行以下命令来安装
pip install pyyaml -i https://mirror.baidu.com/pypi/simple
关于load的使用,可以参考:https://github.com/yaml/pyyaml/wiki/PyYAML-yaml.load(input)-Deprecation
我这边没有全部都读取出来,只读取了部分进行演示。
读取效果如下:

演示代码如下:
# pip install pyyaml -i https://mirror.baidu.com/pypi/simple

import yaml

fs = open('test.yaml', 'r', encoding='utf-8')
cont = fs.read()
# print(cont)

# load的使用:https://github.com/yaml/pyyaml/wiki/PyYAML-yaml.load(input)-Deprecation
x = yaml.load(cont, Loader=yaml.BaseLoader)
print(x['calibrationDate'])
print(x['cameraMatrix']['args'])
print(x['features']['x'])
print(x['features']['y'])
print(x['features']['lbp'])
print(x['frameCount'])


