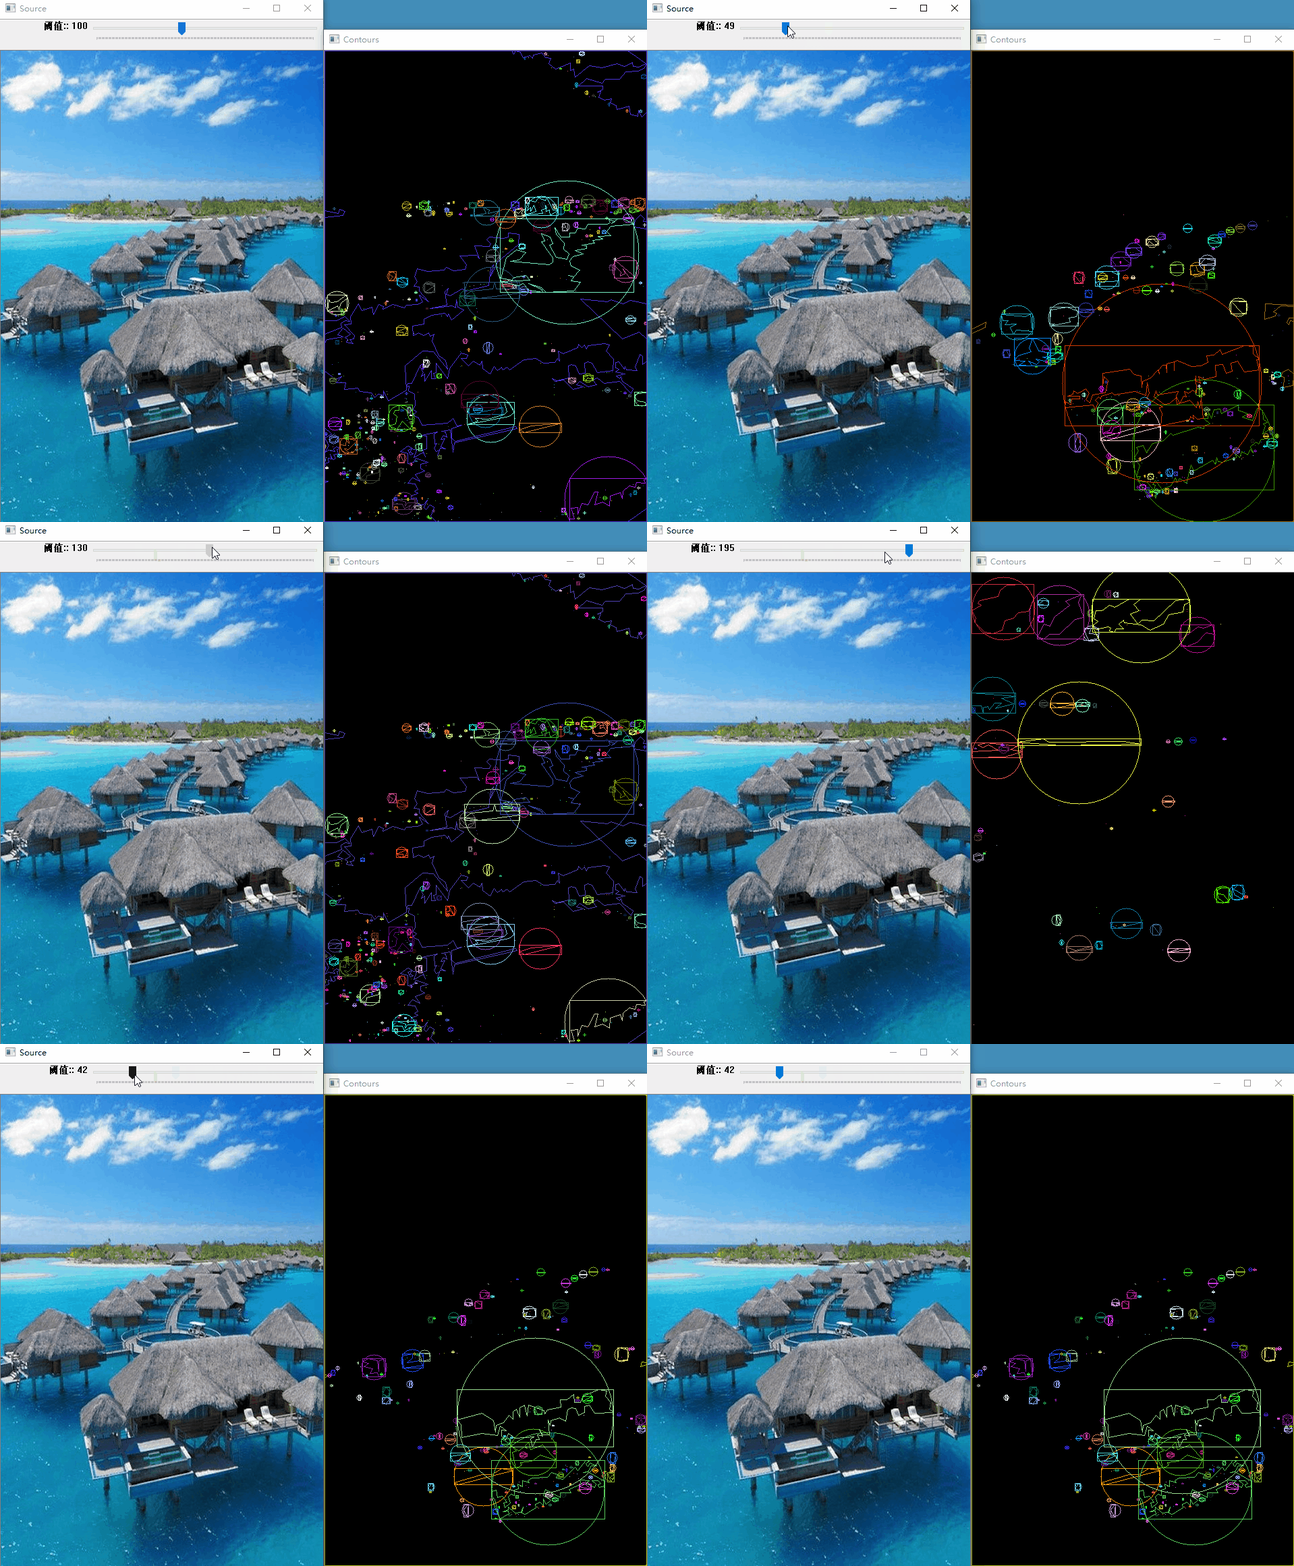
创建包围轮廓的矩形和圆形边界框
视频讲解如下:
在上一节中,给大家演示了轮廓的最小圆形检测,在本章节中给大家演示一个矩形和圆形识别的综合示例,当前代码同样的是在毛星云的代码基础上进行扩展优化的。
C#、C++、Python三种版本的效果其实是一样的,我这里就拿C#的版本来做个演示。
当前系列所有demo下载地址:
https://github.com/GaoRenBao/OpenCv4-Demo
不同编程语言对应的OpenCv版本以及开发环境信息如下:
语言 | OpenCv版本 | IDE |
C# | OpenCvSharp4.4.8.0.20230708 | Visual Studio 2022 |
C++ | OpenCv-4.5.5-vc14_vc15 | Visual Studio 2022 |
Python | OpenCv-Python (4.6.0.66) | PyCharm Community Edition 2022.1.3 |
首先呢,我们需要准备一张测试图片。(不想下载工程的童鞋,可直接复制下面的图片和代码)

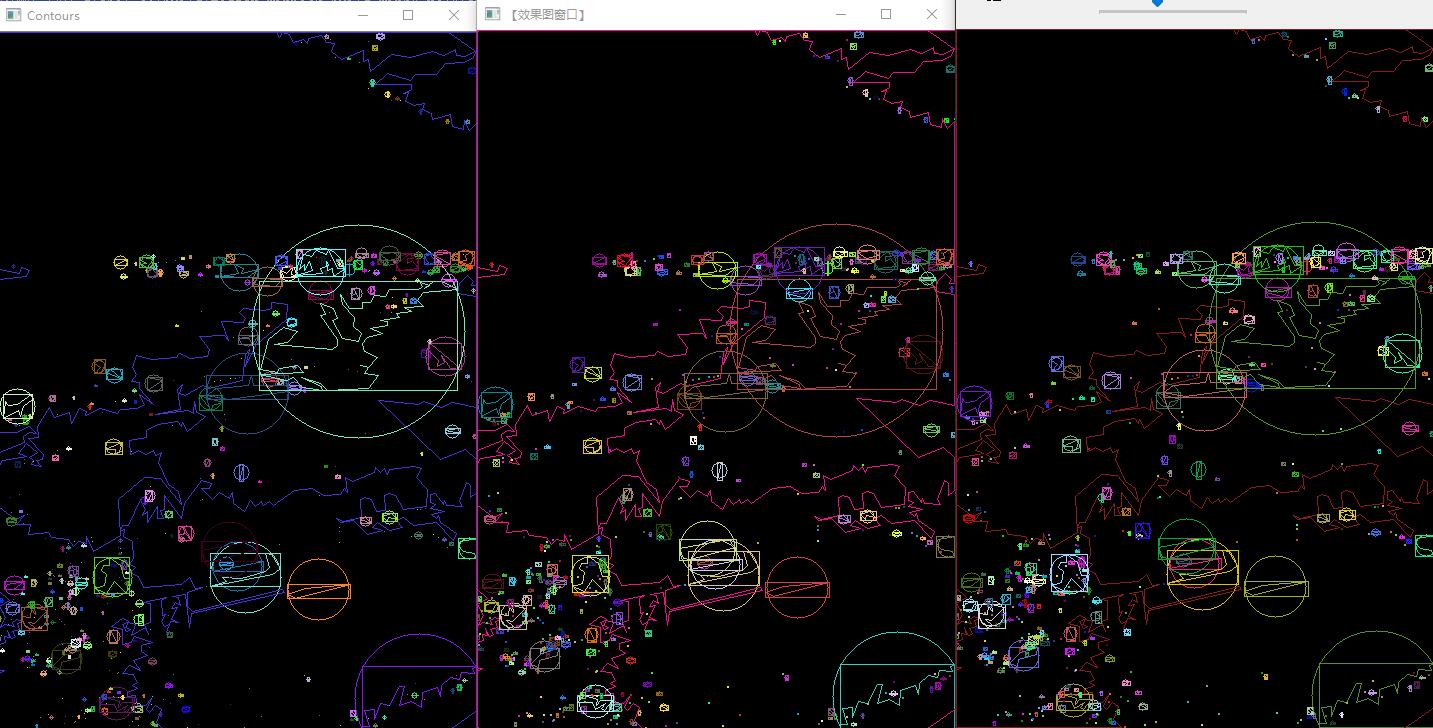
演示效果如下:

三个版本的演示对比效果如下,从左到右分别是:C#、C++、Python,阈值设置都是100.

C#版本代码如下:
C#版本需要安装“OpenCvSharp4”、“OpenCvSharp4.runtime.win”两个库才行。不然会报错。
如果需要使用“ BitmapConverter.ToBitmap”操作,则需要追加安装“OpenCvSharp4.Extensions”库。
using OpenCvSharp;
using System;

namespace demo
{
    internal class Program
    {
        static Mat g_grayImage = new Mat();
        static int thresh = 100;
        static RNG rng = new RNG(12345);

        static void Main(string[] args)
        {
            // 【1】读取图像
            Mat src = Cv2.ImRead("../../../images/home2.jpg");
            if (src.Empty())
            {
                Console.WriteLine("Could not open or find the image!");
                return;
            }
            //【2】得到原图的灰度图像并进行平滑
            Cv2.CvtColor(src, g_grayImage, ColorConversionCodes.BGR2GRAY);
            Cv2.Blur(g_grayImage, g_grayImage, new Size(3, 3));

            //【3】创建原始图窗口并显示
            Cv2.NamedWindow("Source", WindowFlags.AutoSize);
            Cv2.ImShow("Source", src);

            //【4】设置滚动条并调用一次回调函数
            Cv2.CreateTrackbar("阈值:", "Source", ref thresh, 255, thresh_callback);
            thresh_callback(0, IntPtr.Zero);
            Cv2.WaitKey();
        }

        private static void thresh_callback(int pos, IntPtr userData)
        {
            Mat threshold_output = new Mat();
            // 使用Threshold检测图像边缘
            Cv2.Threshold(g_grayImage, threshold_output, thresh, 255, ThresholdTypes.Binary);

            // 找出轮廓
            Point[][] contours;
            HierarchyIndex[] hierarchy;
            Cv2.FindContours(threshold_output, out contours, out hierarchy, RetrievalModes.Tree, ContourApproximationModes.ApproxSimple);

            // 多边形逼近轮廓 + 获取矩形和圆形边界框
            Point[][] contours_poly = new Point[contours.Length][];
            Rect[] boundRect = new Rect[contours.Length];
            Point2f[] center = new Point2f[contours.Length];
            float[] radius = new float[contours.Length];

            // 一个循环,遍历所有部分,进行本程序最核心的操作
            for (int i = 0; i < contours.Length; i++)
            {
                // 用指定精度逼近多边形曲线
                contours_poly[i] = Cv2.ApproxPolyDP(contours[i], 3, true);
                // 计算点集的最外面(up-right)矩形边界
                boundRect[i] = Cv2.BoundingRect(contours_poly[i]);
                // 对给定的 2D点集,寻找最小面积的包围圆形
                Cv2.MinEnclosingCircle(contours_poly[i], out center[i], out radius[i]);
            }

            // 绘制多边形轮廓 + 包围的矩形框 + 圆形框
            Mat drawing = Mat.Zeros(threshold_output.Size(), MatType.CV_8UC3);
            for (int i = 0; i < contours.Length; i++)
            {
                //随机设置颜色
                Scalar color = new Scalar(rng.Uniform(0, 255), rng.Uniform(0, 255), rng.Uniform(0, 255));
                //绘制轮廓
                Cv2.DrawContours(drawing, contours_poly, (int)i, color);
                //绘制矩形
                Cv2.Rectangle(drawing, boundRect[i].TopLeft, boundRect[i].BottomRight, color, 1);
                //绘制圆
                Cv2.Circle(drawing, new Point(center[i].X, center[i].Y), (int)radius[i], color, 1);
            }

            Cv2.ImShow("Contours", drawing);
        }
    }
}
C++版本代码如下:
#include "opencv2/highgui/highgui.hpp"
#include "opencv2/imgproc/imgproc.hpp"

using namespace cv;
using namespace std;

#define WINDOW_NAME1 "【原始图窗口】"        //为窗口标题定义的宏
#define WINDOW_NAME2 "【效果图窗口】"        //为窗口标题定义的宏

Mat g_srcImage;
Mat g_grayImage;
int g_nThresh = 100;//阈值
int g_nMaxThresh = 255;//阈值最大值
RNG g_rng(12345);//随机数生成器

void on_ContoursChange(int, void*)
{
	//定义一些参数
	Mat threshold_output;
	vector<vector<Point>> contours;
	vector<Vec4i> hierarchy;

	// 使用Threshold检测边缘
	threshold(g_grayImage, threshold_output, g_nThresh, 255, THRESH_BINARY);

	// 找出轮廓
	findContours(threshold_output, contours, hierarchy, RETR_TREE, CHAIN_APPROX_SIMPLE, Point(0, 0));

	// 多边形逼近轮廓 + 获取矩形和圆形边界框
	vector<vector<Point> > contours_poly(contours.size());
	vector<Rect> boundRect(contours.size());
	vector<Point2f>center(contours.size());
	vector<float>radius(contours.size());

	//一个循环,遍历所有部分,进行本程序最核心的操作
	for (unsigned int i = 0; i < contours.size(); i++)
	{
		//用指定精度逼近多边形曲线
		approxPolyDP(Mat(contours[i]), contours_poly[i], 3, true);
		// 计算点集的最外面(up-right)矩形边界
		boundRect[i] = boundingRect(Mat(contours_poly[i]));
		// 对给定的 2D点集,寻找最小面积的包围圆形
		minEnclosingCircle(contours_poly[i], center[i], radius[i]);
	}

	// 绘制多边形轮廓 + 包围的矩形框 + 圆形框
	Mat drawing = Mat::zeros(threshold_output.size(), CV_8UC3);
	for (int unsigned i = 0; i < contours.size(); i++)
	{
		//随机设置颜色
		Scalar color = Scalar(g_rng.uniform(0, 255), g_rng.uniform(0, 255), g_rng.uniform(0, 255));
		//绘制轮廓
		drawContours(drawing, contours_poly, i, color, 1, 8, vector<Vec4i>(), 0, Point());
		//绘制矩形
		rectangle(drawing, boundRect[i].tl(), boundRect[i].br(), color, 1, 8, 0);
		//绘制圆
		circle(drawing, center[i], (int)radius[i], color, 1, 8, 0);
	}

	// 显示效果图窗口
	namedWindow(WINDOW_NAME2, WINDOW_AUTOSIZE);
	imshow(WINDOW_NAME2, drawing);
}

int main()
{
	//【0】改变console字体颜色
	system("color 1F");

	//【1】载入3通道的原图像
	g_srcImage = imread("../images/home2.jpg", 1);
	if (!g_srcImage.data) { printf("读取图片错误,请确定目录下是否有imread函数指定的图片存在~! \n"); return false; }

	//【2】得到原图的灰度图像并进行平滑
	cvtColor(g_srcImage, g_grayImage, COLOR_BGR2GRAY);
	blur(g_grayImage, g_grayImage, Size(3, 3));

	//【3】创建原始图窗口并显示
	namedWindow(WINDOW_NAME1, WINDOW_AUTOSIZE);
	imshow(WINDOW_NAME1, g_srcImage);

	//【4】设置滚动条并调用一次回调函数
	createTrackbar("阈值:", WINDOW_NAME1, &g_nThresh, g_nMaxThresh, on_ContoursChange);
	on_ContoursChange(0, 0);

	waitKey(0);

	return(0);
}
Python版本代码如下:
import cv2
import numpy as np
import random

g_nThresh = 100


def on_ThreshChange(x):
    global g_nThresh, g_grayImage, drawing

    # 获取滑动条的值
    g_nThresh = cv2.getTrackbarPos('g_nThresh', 'drawing')

    # 二值化
    ret, threshold_output = cv2.threshold(g_grayImage, g_nThresh, 255, cv2.THRESH_BINARY)

    # 寻找图像轮廓
    contours, hierarchy = cv2.findContours(threshold_output, cv2.RETR_TREE, cv2.CHAIN_APPROX_SIMPLE)

    # 初始化一个空白图像
    drawing = np.zeros((g_grayImage.shape[0], g_grayImage.shape[1], 3), np.uint8)

    # 一个循环,遍历所有部分,进行本程序最核心的操作
    for i in range(len(contours)):
        # 随机设置颜色
        color = (random.randint(0, 255), random.randint(0, 255), random.randint(0, 255))
        # 用指定精度逼近多边形曲线
        contours_poly = cv2.approxPolyDP(contours[i], 3, True)
        # 绘制轮廓
        cv2.polylines(drawing, [contours_poly], True, color, 1, 8)

        # 计算点集的最外面(up-right)矩形边界
        x, y, w, h = cv2.boundingRect(contours_poly)
        # 绘制矩形
        cv2.rectangle(drawing, (x, y), (x + w, y + h), color, 1, 8, 0)

        # 对给定的 2D 点集,寻找最小面积的包围圆形
        (x, y), radius = cv2.minEnclosingCircle(contours_poly)
        center = (int(x), int(y))
        # 绘制圆
        cv2.circle(drawing, center, int(radius), color, 1, 8, 0)


# 载入3通道的原图像
g_srcImage = cv2.imread("../images/home2.jpg")
# 得到原图的灰度图像并进行平滑
g_grayImage = cv2.cvtColor(g_srcImage, cv2.COLOR_BGR2GRAY)
# 均值滤波
g_grayImage = cv2.blur(g_grayImage, (3, 3))
cv2.imshow("g_srcImage", g_srcImage)

# 初始化一个空白图像
drawing = np.zeros((g_grayImage.shape[0], g_grayImage.shape[1], 3), np.uint8)

# 创建窗口
cv2.namedWindow('drawing')
cv2.createTrackbar('g_nThresh', 'drawing', 0, 255, on_ThreshChange)
cv2.setTrackbarPos('g_nThresh', 'drawing', 100)

while True:
    cv2.imshow("drawing", drawing)
    if cv2.waitKey(10) == ord('q'):
        break
cv2.destroyAllWindows()


