DockPanel与ViewBox布局 - (八)
一、DockPanel
DockPanel定义一个区域,在此区域中,您可以使子元素通过描点的形式排列,这些对象位于 Children 属性中。停靠面板其实就是在WinForm类似于Dock属性的元 素。DockPanel会对每个子元素进行排序,并停靠在面板的一侧,多个停靠在同侧的元素则按顺序排序。
如果将 LastChildFill 属性设置为 true(默认设置),那么无论对 DockPanel 的最后一个子元素设置的其他任何停靠值如何,该子元素都将始终填满剩余的空间。若要将子元素停靠在另一个方向,必须将 LastChildFill 属性设置为 false,还必须为最后一个子元素指定显式停靠方向。
默认情况下,面板元素并不接收焦点。要强制使面板元素接收焦点,请将 Focusable 属性设置为 true。
注意:屏幕上 DockPanel 的子元素的位置由相关子元素的 Dock 属性以及这些子元素在 DockPanel 下的相对顺序确定。因此,具有相同 Dock 属性值的一组子元素在屏幕上的位置可能不同,具体取决于这些子元素在 DockPanel 下的顺序。子元素的顺序会影响定位,因为 DockPanel 会按顺序迭代其子元素,并根据剩余空间来设置每个子元素的位置。
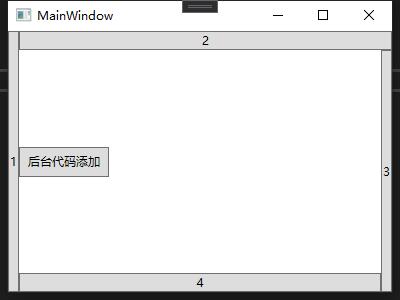
使用XAML代码实现如下图效果。图如下:
<Window x:Class="WpfApp.MainWindow"
        xmlns="http://schemas.microsoft.com/winfx/2006/xaml/presentation"
        xmlns:x="http://schemas.microsoft.com/winfx/2006/xaml"
        xmlns:d="http://schemas.microsoft.com/expression/blend/2008"
        xmlns:mc="http://schemas.openxmlformats.org/markup-compatibility/2006"
        xmlns:local="clr-namespace:WpfApp"
        mc:Ignorable="d"
        Title="MainWindow" Height="300" Width="400">
    <Grid>
        <DockPanel Width="Auto" Height="Auto">
            <Button DockPanel.Dock="Left" Content="1"/>
            <Button DockPanel.Dock="Top" Content="2"/>
            <Button DockPanel.Dock="Right" Content="3" />
            <Button DockPanel.Dock="Bottom" Content="4" />
            <Button  HorizontalAlignment="Left"  Name="btnAddByCode" Height="30" Width="90"
            DockPanel.Dock="Left" Click="btnAddByCode_Click" >后台代码添加</Button>
        </DockPanel>
    </Grid>
</Window>
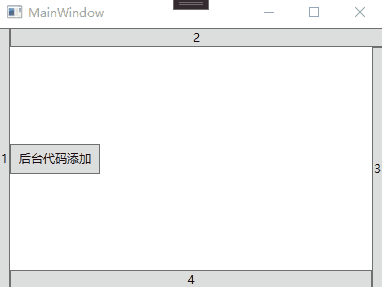
使用C#代码实现如下图效果。图如下:
using System;
using System.Windows;
using System.Windows.Controls;
using System.Windows.Media;
using System.Windows.Shapes;

namespace WpfApp
{
    /// <summary>
    /// MainWindow.xaml 的交互逻辑
    /// </summary>
    public partial class MainWindow : Window
    {
        public MainWindow()
        {
            InitializeComponent();
        }

        private void btnAddByCode_Click(object sender, RoutedEventArgs e)
        {
            DockPanel dp = new DockPanel();
            //  dp.LastChildFill = true;
            dp.Width = Double.NaN;    //相当于在XAML中设置Width="Auto"
            dp.Height = Double.NaN;   //相当于在XAML中设置Height="Auto"
            //把dp添加为窗体的子控件
            this.Content = dp;
            //添加Rectangles
            Rectangle rTop = new Rectangle();
            rTop.Fill = new SolidColorBrush(Colors.BlanchedAlmond);
            rTop.Stroke = new SolidColorBrush(Colors.BlanchedAlmond);
            rTop.Height = 30;
            dp.Children.Add(rTop);
            rTop.SetValue(DockPanel.DockProperty, Dock.Top);

            Rectangle rLeft = new Rectangle();
            rLeft.Fill = new SolidColorBrush(Colors.Gray);
            rLeft.Stroke = new SolidColorBrush(Colors.Gray);
            rLeft.HorizontalAlignment = HorizontalAlignment.Left;
            rLeft.Height = 30;
            rLeft.Width = 30;
            dp.Children.Add(rLeft);
            rLeft.SetValue(DockPanel.DockProperty, Dock.Left);
            Rectangle rBottom = new Rectangle();
            rBottom.Fill = new SolidColorBrush(Colors.Red);
            rBottom.VerticalAlignment = VerticalAlignment.Bottom;
            rBottom.Height = 30;
            dp.Children.Add(rBottom);
            rBottom.SetValue(DockPanel.DockProperty, Dock.Bottom);
        }
    }
}
二、ViewBox
ViewBox这个控件通常和其他控件结合起来使用,是WPF中非常有用的控件。定义一个内容容器。ViewBox组件的作用是拉伸或延展位于其中的组件,以填满可用空间,使之有更好的布局及视觉效果。
一个 Viewbox中只能放一个控件。如果多添加了一个控件就会报错。如下图。
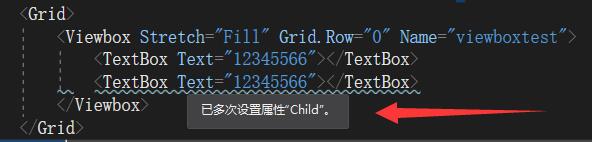
<Viewbox Stretch="Fill" Grid.Row="0" Name="viewboxtest">
    <TextBox Text="12345566"></TextBox>
    <TextBox Text="12345566"></TextBox>
</Viewbox>
组件常用属性:
Child:获取或设置一个ViewBox元素的单一子元素。
Stretch:获取或设置拉伸模式以决定该组件中的内容以怎样的形式填充该组件的已有空间。具体设置值如下:
| 成员名称 | 说明 |
|---|
| None | 内容保持其原始大小。 |
| Fill | 调整内容的大小以填充目标尺寸。 不保留纵横比。 |
| Uniform | 在保留内容原有纵横比的同时调整内容的大小,以适合目标尺寸。 |
| UniformToFill | 在保留内容原有纵横比的同时调整内容的大小,以填充目标尺寸。 如果目标矩形的纵横比不同于源矩形的纵横比,则对源内容进行剪裁以适合目标尺寸。 |
StretchDirection:获取或设置该组件的拉伸方向以决定该组件中的内容将以何种形式被延展。具体的设置值如下。
| 成员名称 | 说明 |
|---|
| UpOnly | 仅当内容小于父项时,它才会放大。 如果内容大于父项,不会执行任何缩小操作。 |
| DownOnly | 仅当内容大于父项时,它才会缩小。 如果内容小于父项,不会执行任何放大操作。 |
| Both | 内容根据 Stretch 属性进行拉伸以适合父项的大小。 |
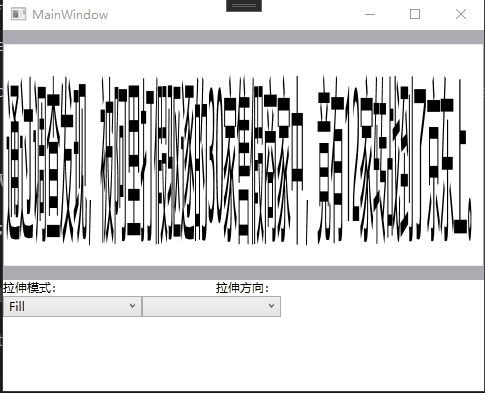
接下来我们做个示例,你可以通过选择下拉框中的不同设置值,来查看不同的效果。效果如下图。
XAML代码实现:
<Window x:Class="WpfApp.MainWindow"
        xmlns="http://schemas.microsoft.com/winfx/2006/xaml/presentation"
        xmlns:x="http://schemas.microsoft.com/winfx/2006/xaml"
        xmlns:d="http://schemas.microsoft.com/expression/blend/2008"
        xmlns:mc="http://schemas.openxmlformats.org/markup-compatibility/2006"
        xmlns:local="clr-namespace:WpfApp"
        mc:Ignorable="d"
        Title="MainWindow" Height="400" Width="500" Loaded="Window_Loaded">
    <Grid>
        <Grid.RowDefinitions>
            <RowDefinition Height="250"/>
            <RowDefinition Height="auto"/>
            <RowDefinition Height="73*"/>
        </Grid.RowDefinitions>
        <Viewbox Stretch="Fill" Grid.Row="0" Name="viewBoxTest">
            <TextBox Text="通过调查发现,被阿里打假驱逐的30家售假商家中,竟有12家转战到了京东上。" />
        </Viewbox>
        <WrapPanel  Grid.Row="2">
            <StackPanel>
                <TextBlock Height="16" HorizontalAlignment="Left"
                           VerticalAlignment="Bottom" Width="65" Text="拉伸模式:" TextWrapping="Wrap"/>
                <ComboBox x:Name="cbStretch" Height="21" HorizontalAlignment="Left"
                          VerticalAlignment="Bottom" Width="139" SelectionChanged="cbStretch_SelectionChanged"/>
            </StackPanel>
            <StackPanel>
                <TextBlock Height="16" HorizontalAlignment="Right"
                           VerticalAlignment="Bottom" Width="65" Text="拉伸方向:" TextWrapping="Wrap"/>
                <ComboBox x:Name="cbStretchDirection" Height="21" HorizontalAlignment="Right"
                	VerticalAlignment="Bottom" Width="139" SelectionChanged="cbStretchDirection_SelectionChanged"/>
            </StackPanel>
        </WrapPanel>
    </Grid>
</Window>
c#代码实现:
using System.Collections.Generic;
using System.Windows;
using System.Windows.Controls;
using System.Windows.Media;

namespace WpfApp
{
    /// <summary>
    /// MainWindow.xaml 的交互逻辑
    /// </summary>
    public partial class MainWindow : Window
    {
        //定义cbStretch与cbStretchDirection的数据源
        List<StretchHelper> cbStretchList = new List<StretchHelper>();
        List<StretchDirectionHelper> cbStretchDirectionList = new List<StretchDirectionHelper>();

        public MainWindow()
        {
            InitializeComponent();
        }
        private void BindDrp()
        { //填充各ComboBox内容
            cbStretchList.Add(new StretchHelper() { StretchModeName = "Fill", theStretchMode = Stretch.Fill });
            cbStretchList.Add(new StretchHelper() { StretchModeName = "None", theStretchMode = Stretch.None });
            cbStretchList.Add(new StretchHelper() { StretchModeName = "Uniform", theStretchMode = Stretch.Uniform });
            cbStretchList.Add(new StretchHelper() { StretchModeName = "UniformToFill", theStretchMode = Stretch.UniformToFill });
            cbStretch.ItemsSource = cbStretchList;
            cbStretch.DisplayMemberPath = "StretchModeName";
            cbStretchDirectionList.Add(new StretchDirectionHelper() { StretchDirectionName = "DownOnly", theStretchDirection = StretchDirection.DownOnly });
            cbStretchDirectionList.Add(new StretchDirectionHelper() { StretchDirectionName = "UpOnly", theStretchDirection = StretchDirection.UpOnly });
            cbStretchDirectionList.Add(new StretchDirectionHelper() { StretchDirectionName = "Both", theStretchDirection = StretchDirection.Both });
            cbStretchDirection.ItemsSource = cbStretchDirectionList;
            cbStretchDirection.DisplayMemberPath = "StretchDirectionName";
        }

        private void cbStretchDirection_SelectionChanged(object sender, SelectionChangedEventArgs e)
        {
            if (cbStretchDirection.SelectedItem != null)
            {
                viewBoxTest.StretchDirection = (cbStretchDirection.SelectedItem as StretchDirectionHelper).theStretchDirection;
            }
        }
        private void cbStretch_SelectionChanged(object sender, SelectionChangedEventArgs e)
        {
            if (cbStretch.SelectedItem != null)
            {
                viewBoxTest.Stretch = (cbStretch.SelectedItem as StretchHelper).theStretchMode;
            }
        }
        private void Window_Loaded(object sender, RoutedEventArgs e)
        {
            BindDrp();
        }
    }
    //辅助类StretchHelper
    public class StretchHelper
    {
        public string StretchModeName { get; set; }
        public Stretch theStretchMode { get; set; }
    }
    //辅助类StretchDirectionHelper
    public class StretchDirectionHelper
    {
        public string StretchDirectionName { get; set; }
        public StretchDirection theStretchDirection { get; set; }
    }
}


